Showing posts with label production. Show all posts

OBIEE Software Configuration Management Part 1 : Initial Deployment from DEV to PROD

’m currently sitting in speaker ready room at the UKOUG Technology & EBS Conference up in Birmingham, and the team are on the stand now ready to meet people at the exhibition. I’ve got an hour or so free now this morning, and so I thought it’d be a good opportunity to blog about one of the sessions we’re delivering later this week at the conference.
The session I’m thinking about is our OBIEE Masterclass that’s running for two hours on the last day of the conference. In previous years we’ve covered the basics of OBIEE development together with performance tuning tips for the BI Server and the underlying Oracle database, and as we’re still waiting for the 11g release to come out, we thought we’d devote this year’s session to some of the perennial questions that come up on the forums, on our blog and when we work with customers. We’re therefore spending half of the masterclass on OBIEE data modeling questions, specifically how do we model normalized data sources, single-table sources and un-conformed star schemas, whilst the second half of the session is being devoted to software configuration management for OBIEE projects.
Software Configuration Management is a topic that seems to come up on most projects, with customers at least wanting to version control their project and have a means to promote code between development, test and production environments. Now there’s not really a defined, standard way to do this with OBIEE projects, and certainly on this blog we’ve talked about various ways to do this, and others have added to the debate with alternatives and suggestions on how to do things better. We’ve also had a utility released, the “Content Accelerator Framework”, that some people have talked about as being a good tool for promoting changes between environments, and now that OBIEE projects are getting more mature and more “enterprise” we’ve also had requests for tips on code branching, code merging and other common software configuration management (SCM) techniques.
So this seemed to me a good area to cover in our OBIEE masterclass. As we’ve got a fair few experts on OBIEE within the company, including people like Venkat J, Adrian Ward, Borkur Steingrimsson and Christian Berg, we had a fair bit of internal debate on what works, what doesn’t work and what’s practical within a project. If you’re interested, I’ve uploaded the resulting slides here and over the next few blog posts, I’ll go through what we came up with, starting in this post with tips on the initial deployment of a project.
To get back to basics though, if you’re working with OBIEE on a project, there are a number of SCM tasks that you’ll want to carry out:
  • We’ll want to set up separate development (DEV), production (PROD), and perhaps test (TST) and user acceptance testing (UAT) environments
  • We’ll then want to be able to promote OBIEE metadata and configuration files between these environments
  • You’ll want to be able to promote individual reports between environments, and create them for users to use
  • You’ll typically want to version your project, so that you can identify releases and refer back to previous versions of the project
  • You may want to branch the code, or work concurrently on separate but linked projects, and then merge the code back into a single code stream
Within an OBIEE system (disregarding the BI Apps or the underlying data warehouse for the time being), there are a number of project elements that you’ll want to include in this process, including:
  • The BI Server repository file (the “RPD” file)
  • The BI Presentation Server web catalog (the “webcat”)
  • various configuration files (the BI server .INI files, instanceconfig.xml etc)
  • various other artifact files (used for setting up writeback, for example), and
  • various web files (CSS etc) if you’ve customized the dashboard UI
For the purposes of this posting, we’ll assume you’ve just got DEV and PROD environments (if you have TEST, UAT etc as well, the process is very similar with additional steps in between when you promote code from one environment to the other). For now though we’ll assume you have just a DEV environment, which is where the developers edit and develop the RPD together with a set of shared reports and dashboards; and PROD environment, where the RPD is “read-only” but users create their own reports in their own web catalog folders.
Migrate0
The first thing to bear in mind here, is that you should generally try and have a single BI Server per physical/virtual server, which you may end up clustering with other single BI Servers on other single physical/virtual servers. There are a fewworkarounds where you can set up a single BI Server with multiple RPDs attached, or indeed install multiple BI Server instances on the same physical/virtual servers, but this is not recommended as OBIEE 10g isn’t really designed for this and you hit issues around files, configuration settings and so on being inadvertently shared amongst all environments. If you want to set up multiple BI Servers on the same box, use VMWare or another such virtualization product to create OS containers and work from there. I have heard that support for multiple BI Servers on the same OS environment is coming in the 11g release, but for now it’s not recommended.
So once you’ve got DEV and TEST environments set up, and you’ve developed your initial system in the DEV environment, how do you go about making use of the PROD environment? For us, you can generally divide up code promotion into two stages:
  1. The initial deployment of the project from DEV to PROD
  2. Subsequent updates of PROD from DEV, for example new releases of the project
This initial release typically involves copying the whole project, including the RPD, the web catalog, the supporting web, configuration and artifact files, from the DEV environment to the PROD one, and we don’t have to worry about merging, overwriting or preserving what’s currently in PROD (as there won’t be anything there yet). The second and subsequent migration require a bit more thought though as you’ll typically want to preserve what’s already in production.
Doing the initial DEV to PROD code promotion is therefore a fairly straightforward process, as there aren’t really any decision points, more a series of steps to remember, as shown in the flowchart below:
migrate114
Starting from the beginning, the typical steps you’d want to perform in this initial migration are:
1. Create a temporary directory somewhere on the DEV server, into which we’ll put all the files to migrate. Shut down the BI Server if the RPD you want to migrate is running online,
Migrate1
and then copy the development RPD to this temporary folder.
Migrate2
2. Next, locate the web catalog folder under $ORACLEBIDATA/web/catalog that holds your reports, dashboards and iBots, zip it up into a single zip archive and then copy it to this temporary directory.
migrate112
3. Now gather up the various configuration, artifact and other files that you need to copy from this environment to the production one. This list isn’t exhaustive, but you’d typically want to gather up the following files and copy them into the temporary directory on the development server.
$ORACLEBI/server/config/*.*
$ORACLEBIDATA/web/config/instanceconfig.xml
$ORACLEBIDATA/web/config/xdo.cfg
$ORACLEBI/web/javahost/config/config.xml
$ORACLEBI/xmlp/XMLP/Users
$ORACLEBI/xmlp/XMLP/Reports
plus any files that you’ve used to customize the dashboard UI, set up writeback and so on. Once you’ve done this, zip up the temporary directory ready for transferring to the production server.
migrate113
4. Now copy this ZIP file from the DEV to the TEST server, unzip the file, and copy the files to the correct location on the production server, including the RPD that contains the BI Server repository and the zipped up web catalog. Watch out for files like NQSCONFIG.INI and instanceconfig.xml that reference machine names in the files, as you’ll need to update these to reflect the naming in the production environment.
6. The RPD that you copied across in step 5 will contain database passwords (and connection details) that may not be relevant in the production environment. If your DBA allows it, you can open up the RPD file and edit the connection pool settings to reflect the production settings.
Migrate25
There are various techniques around to do this in a scripted way, one of my colleagues has defined the database password as a variable and then updated this via an init block and a text file, another technique is this one by Venkat where he uses an undocumented command line interface to the BI Administration tool to set the database password.
7. Now that all of the files are in place, and you’ve copied the RPD over, set the database password(s) and copied across the web catalog, one step you’ll want to consider is to make the production RPD file read-only. This stops inadvertent changes to the RPD in production, though if this is inevitable (for quick fixes etc) you can always make it read-write and apply subsequent changes using the Merge feature recently introduced into the BI Administration tool. If you can though, make the production RPD read-only.
Migrate24
It’s worth taking a copy of the first production RPD at this stage, which we’ll call the “baseline RPD”, as we’ll need this later on if we apply subsequent RPD changes using the three-way merge feature in the BI Administration tool. Take this copy and place it somewhere safe, and we’ll use it at a later date when we start doing incremental updates to the production environment.
8. Now, in order to pick up all the changes you’ve introduced with the migrated files, stop and then restart the BI Server, BI Presentation Server, Javahost and BI Scheduler services, and the BI Cluster Controller if you’re using clustering.
9. You’re now ready to use your system in production. Users can now create new reports in production (within their own User folders, if you ware maintaining the Shared webcat folder in development and plan to overwrite it with each subsequent release), or developers can create reports in the development environment if they are dependent on updates they are making to the RPD, which will be put into production as part of a co-ordinated release.
So that’s how we promote the initial release of the project into production. What about subsequent releases, where we have updates to the RPD to promote and potentially some more shared reports and dashboards? Well, we’ll cover this in the next instalment of the series.
UPDATE : This posting was amended after initial production with a great tip from Kurt Wolff on easier migration of webcats. Thanks, Kurt.

OBIEE Software Configuration Management Part 2 : Subsequent Deployments from DEV to PROD

In the first instalment in this series, we covered the steps that we carry out when promoting the initial version on an OBIEE project from development into production. The process is fairly straightforward and it’s generally a case of using the right tools (the Catalog Manager, for example) and following the list of steps. Things get a bit more interesting when promoting subsequent versions of the project from one environment to another, chiefly because you will probably want to preserve what’s in production (reports generated by users, for example, and maybe some hot fixes to the RPD) rather than just overwrite it all with what’s in the development environment.
One way of looking at this is as a flowchart, where the route we end up taking depends on how much development has also taken place in the production environment:
Migrate27A
If you want to keep life simple, then don’t allow users to create any reports in production; don’t allow changes to the RPD in production; instead, do all development in the development environment and then just repeat the initial product deployment tasks each time you want to promote some changes, in the process over-writing whatever’s in production. In reality though, this isn’t really practical, as users will at a minimum want to create their own reports and there may be some hot-fixes applied to the production RPD that you want to preserve. If this is the case, you’ll want a follow a slightly more nuanced approach to promoting from development to production, making use of the three-way merge facility in the BI Administrator tool, the selective archive and unarchive facility in the Catalog Manager, and the new Content Accelerator Framework plug-in to the Catalog Manager that’s now available for download from OTN.
Assuming you’re working to this situation and your development team have updated the development RPD, created a few new reports based on these changes and now want to promote them to production, here’s the steps we’d typically follow:
1. If you’re sure that no changes have been made in the production RPD that are not already reflected in the development one, you can just copy across the development RPD to production and have done with it. The safer way to update the production RPD would be to three-way merge the development one into it, as this will preserve the changes made in production or at least prompt you to choose between them and any subsequent updates in development that conflict with them.
To start a three-way merge, you’ll need the following three RPD files
i. A copy of the original RPD as initially put into production (this is known as the “baseline” RPD)
ii. A copy of the current production RPD (which may now differ from the baseline RPD)
iii The development RPD that you want to merge into the current production one.
Migrate42
Once you’ve got all these files together, we can start on the three-way merge of the RPDs.
2. To start merging, open up the BI Administration tool using an offline copy of the current production repository.
Migrate44
3. From the application menu, select File > Merge… and then select the baseline RPD as the original RPD.
Migrate44A
4. The merge process will then parse the original and current production RPDs to identify and differences between them. If this is the first time you have updated the production RPD, and you’ve not made any changes to it in production, then this process will come up blank, otherwise it’ll point out any changes between the original and current production RPDs.
Migrate47
5. Now you can select the development RPD that you’d like to merge into the production one. Press the Select… button next to the Modified Repository area and pick up the development RPD. It’s most likely that there will be no conflicts (there may be though if you’ve applied hotfixes to the production one), and so you’ll need to press the Stats button to see what items will be added, deleted or updated during the merge process.
Migrate48
6. Now that the production RPD has been updated, it’s time to consider the web catalog. Again, if you don’t let users develop reports in production, or at least you don’t let them develop in the Shared area, you can just archive and then unarchive the Shared and/or the Users folders from the development web catalog to the production one, using the Catalog Manager, to copy across the new reports. If you just want to migrate a few individual reports though, there’s a new option in the form of the Content Accelerator Wizard that you can use for this purpose.
UPDATE : Kevin McGinley points out a blog post some significant shortcomings of CAF in the context of development to production migrations. Read his post in conjunction with his one, and also strongly consider a regular copy-and-paste between two open copies of the Catalog Manager if the circumstances he describes applies to you.
The Content Accelerator Wizard (CAF) is a plug-in to the Catalog Manager that migrates reports between two environments, and will also create any logical column calculations that the reports depend on but that aren’t found in the target RPD. Coupled with a standard RPD three-way merge this is quite a neat way to migrate individual reports from development to production, as you don’t need to have two copies of the Catalog Manager open at one time and it takes care of any calculated columns that you need.
After installing CAF and making sure that the Catalog Manager is pointing towards a JDK 1.6 or higher, open the Catalog Manager to point to the development environment, and select the report you wish to promote (or “clone”) into production.
Migrate63
7. When the clone process starts, you are prompted to select the target web catalog (this need to be an online catalog, and can be either local or a remote server), and the location of the source and target BI Server repository (RPD) file, which have to be connected to offline. The RPD files are required so that the cloning process can create any logical calculations that are needed by the cloned report (if the report requires full logical columns, you’ll need to add these to the target RPD using a three-way merge).
Migrate64
The wizard then prompts you to select the target subject area that the cloned report will be mapped on to.
Migrate65
8. Next comes the mapping process. The logical columns in the source web catalog need to be mapped to their corresponding columns in the target web catalog, together with dimension levels, something that you need to do manually but that can be saved, as a CSV file, to use again in later migrations. Any new calculated columns are added automatically by CAF, but if there isn’t a corresponding target column to map regular columns to then you’ll need to bring it in via an RPD three-way merge.
Migrate66
9. Finally, the migration takes place, and you can choose to perform a consistency check as well as view the log of migrated objects.
10. Once the migration has happened, you can take a look in the target web catalog and see the new report, ready to run and within the /Shared/Cloned folder. The target RPD will have any new calculated logical columns added, with “Autogen” as the name prefix.
Migrate67A
So there you have it, one method to do incremental updates of OBIEE projects. In the next instalment, we’ll take a look at version control using Subversion and TortoiseSVN.

Oracle BI EE 10.1.3.4 – Switching between Production and Development Data Sources using same Reports and Dashboards

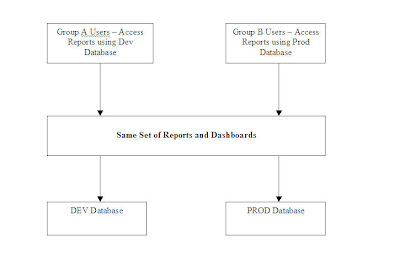
I was recently involved in a client project wherein the client was implementing BI EE on top of an Oracle Database. Since they were on a shoe-string budget, they could not afford to have a couple of servers for BI EE Development and Production. Of course, not an ideal situation, they did have a couple of instances of the database (one for development and the other for production). These databases were populated using Informatica from an external source. Since, the client had only one instance of BI EE, they wanted to know whether it is possible to switch between production and development databases just by means of a single prompt (for administrators alone to test the data validity across the database instances). Though a very unique request, it made sense due to the frequency of development happening on the dev databases. Also, they wanted a capability wherein a set of users would be looking at a set of reports reporting against the dev database and another set of users would be reporting on the same set of reports on the production database. The below diagram provides the details on what is required.
        
Lets look at an approach today using which we shall achieve the above requirement. So, in effect our aim is to have a prompt across all the reports, which will switch between the development and production databases (for Administrators). For demonstration purposes, i would be using the Global Schema. Lets consider the Global Schema as the actual development database. Also, lets consider another schema called global_prod which would have the production database tables.
        
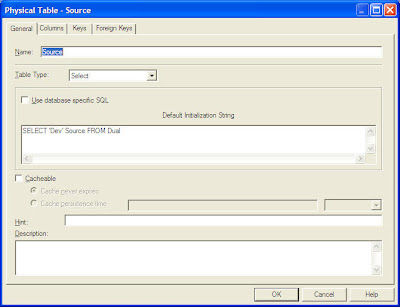
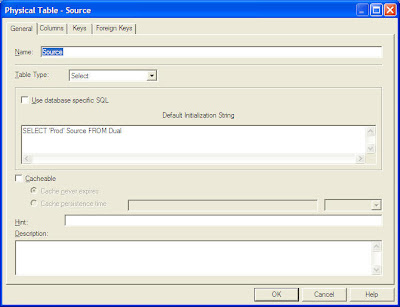
As you see, we have the same set of tables in both prod and dev databases. Typically any Administrator would like to run the reports on both dev and prod to determine any possible issues. So, lets start with designing the BMM layer for these 2 schemas. The idea is to create a single BMM layer which will fetch data from either prod or dev depending on the fragmentation set in the repository. To start with, lets create a simple select view in both Dev and Prod to return the actual values that we would choosing in the prompts for Dev and Prod.
1SELECT 'Dev' FROM DUAL
1SELECT 'Prod' FROM DUAL
        
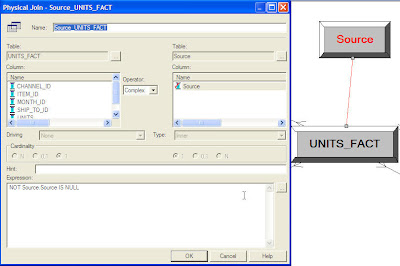
Now, for each of these new sources, create a complex join with the fact tables as shown below
        
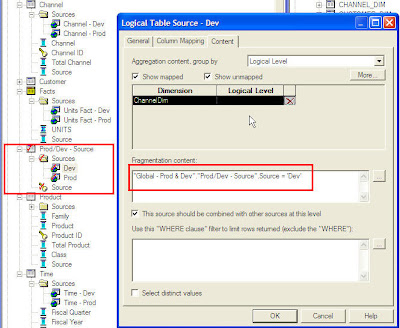
Now, in the BMM that we are building, add a custom dimension with a single column called Source using both the above custom select views as Logical Table Sources. Also, set the fragmentation in such a way that one LTS is chosen, when Dev is chosen in the prompt and the other LTS is chosen when Prod is chosen in the prompt as shown below.
        
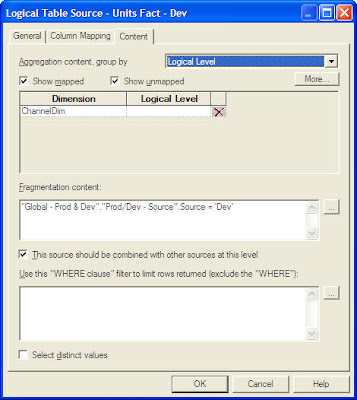
Now, for all the dimensions and the fact tables, include both the Prod and dev sources. Ensure that fragmentation is set for each one of them to Prod or Dev depending on the LTS. For example, the fact table related Dev LTS is shown below
        
I have not shown the dimension build and other aspects in the RPD BMM as everything else would remain the same. Instead of one LTS for each dimension, use 2, one for prod and the other for dev. Of course, as your RPD becomes complex, adding more and more LTS would only make the RPD to grow big. That is something one would have to consider. But this approach has very good flexibility and can be implemented by anyone who wants implement a similar requirement.
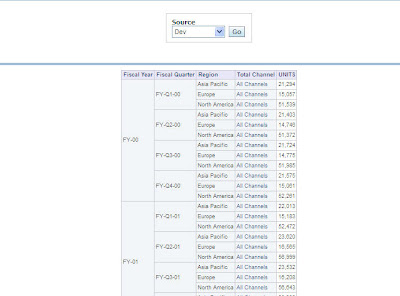
Now lets log into Answers and check how this works. Create a very simple report as shown below and have the Dimension Source column as Is Prompted in your report. Also create a prompt to show the Source values of Prod and Dev. Include the report and the prompt in the dashboard. Lets choose Dev first and run the report.
        
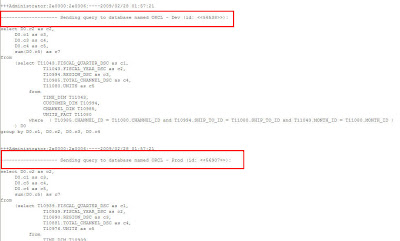
If you look at the query, you would notice that Dev database is used for generating the above report.
        
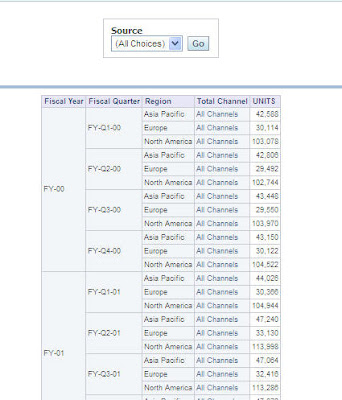
The same would be the case for Prod as well. But one drawback is that, if we do not include this filter, we would get a union all from both the LTS as shown below.
        
        
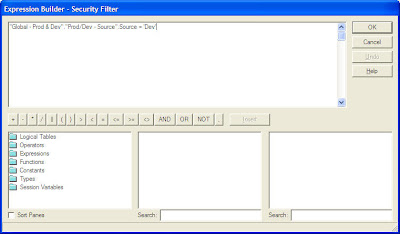
One cannot expect every user to create a prompt like the one above in each and every report. So, in order to avoid the duplicate issue and to ensure that a group of users automatically have a Dev or Prod filter assigned to them just add a custom Security Group and add the filter as shown to each and every Logical Table in the BMM. One Security Group would have a filter on Dev and the Other on Prod. So, anytime a specific user from one of the above groups creates a report, the Dev or Prod filter is automatically passed and this will ensure that the fragmentation happens properly.