Showing posts with label delivers. Show all posts

Oracle BI EE 10.1.3.3/2 – Removing URL Links to Marketing, Disconnected Analytics and Delivers

Another good question came up in the forums yesterday with regard to Dashboard Customization. As you might probably be aware, when one purchases BI SE1, the licensing of BI SE1 does not allow users to use components like Marketing, Disconnected Analytics and Delivers. When you install BI SE1 you would notice that these components would not be visible from the Dashboards — More Products link. But if you notice, BI SE1 comes with 10.1.3.2 version of BI EE. So, whenever you are doing an upgrade then the component links like Marketing, Disconnected Analytics and Delivers would reappear in the dashboard(if you are not restoring the older XML files). Now, the question is how do we go about removing these links. In order to remove these links, the set of steps would be similar to what we saw here. In our example, we shall see how to go about removing the Marketing link. The procedure to remove the other links would be the same.
1.   The first step is to copy the commonuitemplates.xml file from {OracleBI}webmsgdbmessages to {OracleBIData}webmsgdbcustomMessages (if you do not have this folder, create one).
2.   Open this copied file in a text editor and search for the kuiMainBarActionsMenuswebmessage.
      
3.   In this web message, you would find an XML like the one below
<sawm:if name=”marketingURL”><a class=”NQWMenuItem” name=”marketing” href=”@{marketingURL}” mce_href=”@{marketingURL}” target=”@{target}”><sawm:messageRef name=”kmsgUIMarketing”/></a></sawm:if>
This is the XML that makes the Marketing URL to be visible from the dashboard. Just remove the above XML from the actual message and save the file. Your final XML for this webmessage should look like the one below
<WebMessage name=”kuiMainBarActionsMenus” translate=”no”><HTML>
<div id=”MainBarProductMenu” class=”NQWMenu” align=”left” onmouseover=”NQWMenuMouseOver(event)”><sawm:messageRef name=”kuiMenuShadowBegin”/><sawm:if name=”deliversURL”><a class=”NQWMenuItem” name=”delivers” href=”@{deliversURL}” mce_href=”@{deliversURL}” target=”@{target}”><sawm:messageRef name=”kmsgUIiBots”/></a></sawm:if><sawm:if name=”advReportingURL”><a class=”NQWMenuItem” name=”advReporting” href=”@{advReportingURL}” mce_href=”@{advReportingURL}” target=”@{target}”><sawm:messageRef name=”kmsgUIAdvancedReporting”/></a></sawm:if><sawm:if name=”marketingURL”><a class=”NQWMenuItem” name=”marketing” href=”@{marketingURL}” mce_href=”@{marketingURL}” target=”@{target}”><sawm:messageRef name=”kmsgUIMarketing”/></a></sawm:if><sawm:if name=”mobileURL”><a class=”NQWMenuItem” name=”mobile” href=”@{mobileURL}” mce_href=”@{mobileURL}” target=”@{target}”><sawm:messageRef name=”kmsgUIMobile”/></a></sawm:if><sawm:if name=”officeURL”><div class=”NQWMenuItemSeparator”/><a class=”NQWMenuItem” name=”mobile” href=”@{officeURL}” mce_href=”@{officeURL}” onclick=”NQWClearActiveMenu()”><sawm:messageRef name=”kmsgUIBIforOffice”/></a></sawm:if><sawm:messageRef name=”kuiMenuShadowEnd”/></div><div id=”MainBarSettingsMenu” class=”NQWMenu” align=”left” onmouseover=”NQWMenuMouseOver(event)”><sawm:messageRef name=”kuiMenuShadowBegin”/><sawm:if name=”adminURL”><a class=”NQWMenuItem” name=”admin” href=”javascript:void(null)” mce_href=”javascript:void(null)” onclick=”saw.popupWindow(‘@{adminURL}’,'SAWAdmin’);saw.clearActiveMenu();return false”><sawm:messageRef name=”kmsgUIAdmin”/></a></sawm:if><sawm:if name=”canProxy”><a class=”NQWMenuItem” name=”proxy” href=”javascript:void(null)” mce_href=”javascript:void(null)” onclick=”saw.proxy.showProxyDialog(‘@{proxyTargetAccount}’, ‘@{proxyStartPage}’, event);saw.clearActiveMenu();return false;”><sawm:messageRef name=”kmsgUIProxy”/></a></sawm:if><sawm:if name=”prefsURL”><a class=”NQWMenuItem” name=”prefs” href=”javascript:void(null)” mce_href=”javascript:void(null)” onclick=”saw.popupWindow(‘@{prefsURL}’,'SAWPrefs’);saw.clearActiveMenu();return false”><sawm:messageRef name=”kmsgUIMyProfile”/></a></sawm:if><sawm:messageRef name=”kuiMenuShadowEnd”/></div></HTML></WebMessage>
4.   Save the file after making changes to the web message. Restart presentation Services. Now you would notice that the Marketing URL would not be visible under More Products link.
      

Oracle BI EE 10.1.3.3/2 – Integrating Scheduler/Delivers into Other Applications

Lets look at an important utility today that would enable Application developers to integrate BI Scheduler/Delivers into their application. That utility is called as SASchinvoke.exe. This enables end users to call/run ibots programmatically from any application(You dont have to come into Delivers). One of the major advantages of this utility is that you can run an ibot at any given time i.e You can call ibots on demand. You cannot do this from answers since all the ibots are triggered at specific time periods and you do not have the flexibility to call them on demand. Lets look at how to go about using this utility. You can find this in {OracleBI}/Server/Bin folder. The Syntax for the utility is as shown
Usage:   SASchInvoke.exe
-u <Admin Name>/<Admin Password>
                        (-j <job id> | -i <iBot path>)
                        ([-m <machine name>[:<port>]]
                        | -p <primaryCCS>[:<port>] -s <secondaryCCS>[:<port>])
                        ([(-r <replace parameter filename>
                            |-a <append parameter filename>)]
                         | [-x <re-run instance id>])
                        [-l
                         [-c <SSL certificate filename>
                          -k <SSL certificate private key filename>]
                         [-w <SSL passphrase>|-q <passphrase_file>|-y]
                         [-h <SSL cipher list>]
                         [-v
                          [-e <SSL verification depth>]
                          -d <CA certificate directory> | -f <CA certificate file>
                          [-t <SSL trusted peer CNs>]
                         ]
                        ]
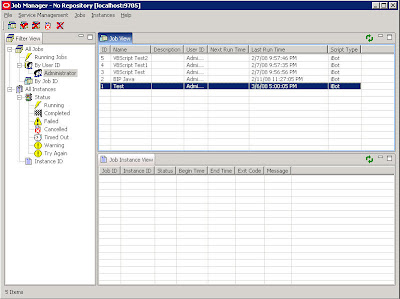
This has a lot of options and you pass multiple parameters(we would not be discussing all of them). Lets look at a simple example of calling ibots using this utility. In order to execute an ibot, all we need is either the ibot’s Job id or its path. You can find the Job id from Job Manager.
      
In our case, lets run the ibot with a Job ID of 1.
saschinvoke -u Administrator/Administrator -j 1
      
      
We shall be using this utility in a variety of different applications which i shall be discussing in future blog entries. The above should give you a basic idea of what this can do.

Oracle BI EE 10.1.3.3/2 – Scheduling Cache Purging – Phase 2 – Using Java and Delivers

If you had seen my previous blog entry here, i would have shown you a procedure to purge the cache on a periodic basis using Java Script. I was asked today about the possibility of doing the same using Java. So, lets look today how to go about scheduling cache purges using Java and Delivers.
1.   The 1st step to achieve this is to create a SQL.txt file containing the actual ODBC call.
{call SAPurgeAllCache()};
      
In my case, i have created this in D:\ drive.
2.   Now, create a batch file which would make the following call to NQCmd.exe. You can store the batch file anywhere. The following would be the contents of the batch file.
D:\Oracle\OracleBI\server\Bin\nqcmd.exe -d AnalyticsWeb -u Administrator -p Administrator -s D:\SQL.txt -o D:\Output.txt
3.   Open JDeveloper and compile the following java program.
package bieesoap;
import com.siebel.analytics.scheduler.javahostrpccalls.SchedulerJavaExtension;
import com.siebel.analytics.scheduler.javahostrpccalls.SchedulerJobException;
import com.siebel.analytics.scheduler.javahostrpccalls.SchedulerJobInfo;
public class CachePurgeRun implements SchedulerJavaExtension {
public CachePurgeRun() {
}
public void run(SchedulerJobInfo jobInfo) throws SchedulerJobException
{
try
{
Process p = null;
//String[] cmdAry = {nqCmd,” -d “, dsn, ” -u “, user, ” -p “, pswd, ” -s “, tempInFileName, ” -o “, tempOutFileName};
String[] cmdAry = {“D:\\CachePurge.bat”};
p = Runtime.getRuntime().exec(cmdAry);
}
catch(Exception ex)
{
throw new SchedulerJobException(1, 1, ex.getMessage());
}
}
public void cancel() {
}
}
As you see, what this above code does is, it makes a call to the NQCMD.exe file and passes the SQL.txt file as its argument. Once this is executed the output would be stored in the output.txt file.
4.   Now, bundle the above java code into a jar file (for details on how to do this check my blog entry here
5.   Once this is done, just go to delivers and call this java class from the Advanced tab. You can schedule this periodically.
      
6.   Just keep checking the output.txt to know whether the cache purge has completed successfully.
      

Oracle BI EE 10.1.3.3/2 – Report Bursting using Delivers – Phase1 Using Pipelined Functions

Note: Though i have shown email addresses below those are actually users. You can burst to multiple users who are part of the repository and not email addresses directly. But you can have multiple email addresses as part of a user. 
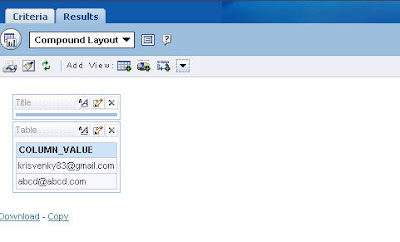
One of the very good features of BI EE is its ability to burst and send the reports to multiple users simultaneously. Lets look at how to go about achieving bursting and also at the same time look at some additional examples of how to send out the reports to multiple users whose email ids are not stored a database column. First lets look at how to burst reports out using Delivers. In order to do bursting, one would have to have a column in the database that would have all the email ids of the end users to whom you would like to do the bursting to. So, the first step in enabling bursting is to create a report containing the email id column. This report can contain all the desired filters that you want to apply on this report. For example, in my case i have 2 of my own email ids in the report.
      
Once this is done the next step is to create an ibot. While creating the ibot follow these steps below
1.   In the conditional request tab enter the report that we just created above. This is what will be used for bursting.
      
2.   Go to the Recipients tab and enable the checkbox wherein you can determine the users from a Conditional Request. Choose the column that contains the email ids.
      
3.   Now go to the Delivery Content Tab and choose the report which you would like to send.
      
4.   Also choose the kind of scheduling that you need along with the desired Destinations (Email, Pager etc).
This would give you the basic bursting capabitlites that you are looking for. But in some cases it so happens that we would like to send the reports to users whom we know but those that are not stored inside a database column. So, in order to configure delivers for this case we shall see 2 approaches
1.   Use of Pipelined Functions and Direct Database Requests
2.   Use of Writebacks
In this blog entry i shall be covering the first approach. This is not recommended for production machines. This is just for illustration purposes since Direct Database Requests are not recommended (they bypass all of your BI EE security). In order to achieve this lets start with creating a simple Pipelined function as shown below
CREATE OR REPLACE TYPE VAR_ARRAY AS TABLE OF VARCHAR2(100);
CREATE OR REPLACE FUNCTION PIPE_EMAIL( p_csv IN VARCHAR2)
RETURN VAR_ARRAY
PIPELINED
AS
v_inCSV varchar2(50);
v_noCSV number;
v_inSTR number;
v_enSTR number;
BEGIN
SELECT LENGTH(p_csv) – LENGTH(REPLACE(p_CSV,’,',”)) INTO v_noCSV FROM DUAL;
v_inSTR := 1;
SELECT DECODE(INSTR(p_CSV, ‘,’, 1,1),0,LENGTH(p_CSV) + 1,INSTR(p_CSV, ‘,’, 1,1)) INTO v_enSTR FROM DUAL;
FOR I in 1..v_noCSV + 1 LOOP
SELECT SUBSTR(p_CSV,v_inSTR,v_enSTR – v_inSTR) INTO v_inCSV FROM DUAL;
PIPE ROW(v_inCSV);
v_inSTR := v_enSTR + 1;
SELECT DECODE(INSTR(p_CSV, ‘,’, v_enSTR + 2,1),0,LENGTH(p_CSV) + 1,INSTR(p_CSV, ‘,’, v_enSTR + 2,1)) INTO v_enSTR FROM DUAL;
END LOOP;
RETURN;
END PIPE_EMAIL;
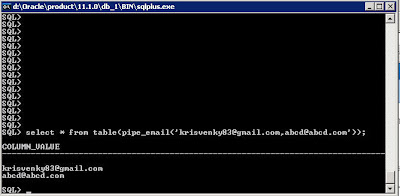
So what this basically does it accepts comma seperated email ids as its arguments and will convert them into rows of data. For example if you give ‘krisvenky83@gmail.com,abcd@abcd.com’ as its argument then it will print like this
krisvenky83@gmail.com
abcd@abcd.com
         
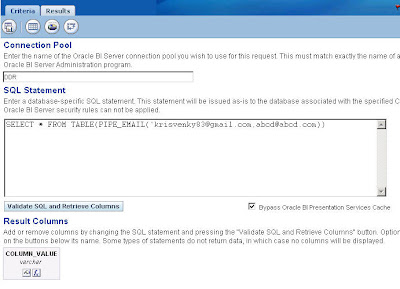
So, all you need to do is to create a new report using Direct Database Requests and typein the following
select * from table(pipe_email(‘krisvenky83@gmail.com,abcd@abcd.com’))
In your case, instead of the email ids specified above you can put as many comma seperated email ids as you want. Now save this report.
      
      
Now the procedure to burst is same as the above. But now we do not have to have the email ids stored in a database column. In a later blog entry we shall see another approach to the same problem that would use Writebacks.

Oracle BI EE 10.1.3.3 – Configuring Delivers – iBots

I had one OBI EE user today who had specifically asked about configuring iBots. Though it is pretty straight forward, the customer was looking out for a screenshot by screenshot tutorial on how to go about setting delivers. Well, i had some time to put this one together. Hopefully, you would find it of some use.
1.   The first step is to configure a schema that would hold all our scheduler tables. If you do not have a schema create or use an existing one. In my case i have a schema called S_NQ_SCHED wherein i would create all my scheduler tables.
2.   Navigate to your {ORACLEBI}/Server/Schema folder and run the scheduler scripts. If you are on an Oracle Database, you would have to run SAJOBS.Oracle.sql. This would basically create the scheduler tables that Oracle Delivers would use later.
3.   The next step is to open your Job Manager. Go to File – > Configuration Options and enter the schema and connection details for the scheduler schema. In my case it would be S_NQ_SCHED schema.
      
4.   Go to the General tab. If you had followed the default install, then leave everything the same. Just enter in the Administrator usernames and passwords.
   
5.   Go to the Mail tab and enter in your mail server details.
      
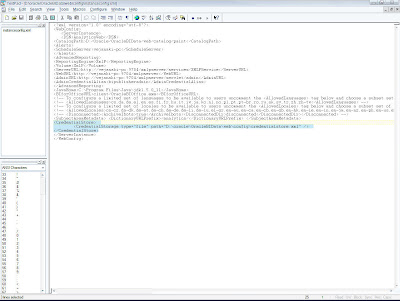
6.   Open your instanceconfig.xml and add in the scheduler details. This step basically lets the presentation server know about the machine and port details of the scheduler. By default the scheduler port is 9705.
      
7.   The next step is to run a cryptotools utility that would basically store the username and password of the scheduler into an XML file called credentialstore.xml.
8.   Go to {OracleBI}/web/bin from command prompt. Then enter in the following command.
cryptotools credstore -add -infile OracleBIData_HOME/web/config/credentialstore.xml
   
Ensure that you have the alias as “Admin”.
9.   The next step is to add the details of this credentialstore.xml file into the instanceconfig.xml.
   
Once this is done you should be able to schedule and create new ibots. The best and quick way to check whether the configuration has been done properly is to save a sample ibot. If you are able to properly save one then your configuration has been properly set. For more details refer the docs here.

Groups, Webgroups, and Delivers

I thought it would be worth exploring the interrelated topics of repository groups, web groups, system session variables,  Delivers, the SA System subject area, and My Account. 
First comment: I am not sure that anyone knows any more, if they ever did, how all these things are actually supposed to interrelate. The best we can do is try things, see what happens, and learn from experiment and experience.
To that end, I created the table Users1 with information about  four users, including their BI server (RPD) group and presentation server (Web) group memberships. My practice is to not use the same names for BI server groups and presentation server groups.  (Things get confusing rapidly if you do that, in my opinion). This is the content of the table:
image
User authentication occurs via an initialization block called “Authenticate”. The SQL of the Authenticate init block is:
Select
Logon
, Displayname
, RPDGroup
, Webgroup
from
Users1
where
upper(Logon) = upper(':USER')
NQS_PASSWORD_CLAUSE(and password =':PASSWORD')NQS_PASSWORD_CLAUSE
The session variables populated by this init block are
image
There are a couple of basic things to know here.  :USER is the user ID entered by the user in the logon screen (or passed to the BI Server by some external authentication system, such as Oracle SSO). :PASSWORD is the password entered by the user. Both of these have to be typed in upper case in the SQL.  Note: Enclosing the constraint on password with NQS_PASSWORD_CLAUSE as shown in the SQL above is required with Delivers. If your system uses SSO to authenticate users, then remove the password constraint from the init block completely.
The session variables to be populated by the init block have to be in the same order as the columns in the SQL. Variable population depends on the order only, not in matching the names of the columns to the names of the variables. NOTE : because order of the variables is the only thing that matters, beware that sometimes, spontaneously it seems, the order of variables can change. If this occurs, break up your init block into multiple init blocks until the order of variables remains stable.
The variables names used here are special system session variables. Note: The variable “GROUP”  is singular, but you can assign a user to multiple groups in the init block. “WEBGROUPS” is plural. If you enter “WEBGROUP” (singular) the init block will not assign users to web groups.
In the Users1 table, users are being assigned to multiple groups and web groups with group and webgroup names separated by semi-colons. (Another way to do this would be to populate GROUP or WEBGROUPS variables using  row-wise initialization. As far as I can tell, both methods work the same in all respects.)
To illustrate how this works, let’s use an example RPD having five presentation catalogs.
image
BI Server group “GroupA” has access to Retail Data A. GroupB has access to Retail Data B, etc.  The table User1 puts A in GroupA and GroupB. Here’s what A sees in Answers.
 image
If A goes to My Account in the web UI, it shows that A is a member of the web group  WebA.
image
User B logs in and also sees Retail Data A and Retail Data B, since B is also a member of GroupA and GroupB. My Account shows B belongs to web groups WebA and WebB.
image
User C logs in, sees three subject areas, and is a member of three web groups.
image  image
At this point in time, users A, B, and C have logged in but user D has not. Now the administrator user logs in and examines the list of users and groups in the Administration UI in the web. Here’s what the administrator sees: users A, B, and C are listed as users.
image
If Administrator looks at who is a member of WebA, however, no one is listed.
image
The user’s name persists once the user logs in,  but the web group membership appears not to.
In Delivers, you can name a web group as a recipient of an alert. What happens when the alert is addressed to members of WebA at this point? Since WebA has no members, there are no recipients. Users A, B, and C will not receive the alert. If  the administrator tries to add A, B, and C to WebA, he will see this.
image 
In this context, the web catalog appears to remember that A, B, and C have been assigned to WebA, and it is not possible for the Administrator to add them.  Now suppose User D logs in.  He now becomes a listed Catalog User and a member of WebD, as shown on his My Account page.
image
Now if Administrator logs in and attempts to add users to WebA, this is what he sees.
image
D, who has not been a member of WebA, can be added, but not A, B, or C. Suppose the administrator adds D to WebA.
image
When D logs in and goes to the My Account page, it shows his group membership includes WebA and WebD.image
Now suppose the Administrator creates an iBot using the subject area Retail Data A with Personalized data visibility and chooses the group WebA as a recipient.
image
image
When User D logs in he will not see the alert.
image
The reason is that only members of the repository group GroupA have access to the subject area Retail Data A. When the Administrator modifies the data visibility setting of the alert so that it is Not Personalized and is run as the Administrator user, User D will receive the alert.
image
image
image
User A is a member of GroupA, therefore has access to the subject area Retail Data A. When A logs in, he doesn’t see the alert notification, since A is not an explicit member of Web Group A – he is a member by virtue of the value of the WEBGROUPS session variable.
image 
However, when he clicks on More Products|Delivers|Show iBots Acting On My Behalf, the alert is listed. It’s listed as acting on his behalf but, apparently, he won’t receive the contents of the iBot!
image
By the way, clicking on the iBot link, “QS Alert”, only shows the settings of the iBot, not the contents.
image
Even if A is logged on at the time the iBot is running, he will not see the iBot alert.
What about the “SA System” subject area? The basic purpose of SA System is to set the delivery profiles of users, providing default delivery settings for users who have not entered settings in My Account. (SA System can also overwrite user settings in My Account if a parameter to do that is set in instanceconfig.xml).
In this example, SA System columns are mapped  to columns in the Users1 table or to string constants in the metadata for logical columns Email, Email Type, Email Priority, Cell Phone, and Cell Phone Priority.
image
When UserC, who has not set up and devices or delivery profiles, views My Account settings, he sees a System Email device and a System Profile.
image
These conform to the settings from SA System.
image
image
When A views My Account, he sees the settings from SA System, but they are not active, since A has defined his own settings.
image
There is a way to get Delivers to deliver content to all members of WebA, however. Set up another request (it could use the SA System subject area, but it doesn’t have to) that will return the members of WebA. Then make this request the conditional request for the iBot.
The following query was saved as “Deliver to WebA”.image
This query was specified as the conditional request in the iBot.
image 
The Recipients tab was set to determine recipients from the conditional request.
image 
The Delivery Content tab is where the query that generated content was specified.
image
The iBot was fired off. When user A logged in, this time he saw the alert.
image
However, the shortcoming here is that you cannot deliver personalized results. Suppose there are filters on Groups A, B, and C when querying Retail Data A. GroupA sees only Product A, GroupB sees only ProductB, and GroupC sees only ProductC.
UserA and UserB are members of both GroupA and GroupB. Their results include both Product A and Product B.
image
Members of Group C (which User C belongs to)  see only Product C.
image.
An iBot that has a conditional request (“Deliver to WebA”), specific named recipients (Users A, B, and C), and personalized data visibility does not get delivered.
image
After modifying this iBot so that the conditional request is the same as the content (the query “QS” is used for both), Users A, B, and C receive the iBot with personalized content.
image
So where are we? It would be nice to be able to assign users to web groups using session variables, to send iBots to those users by specifying groups as recipients, and to personalize the content of the iBots. It seems as though there ought to be a way to do all this, but the pieces in OBIEE don’t really seem to fit together at this time. Depending on what you want to achieve, you may need to use a variety of methods to configure iBots and deliver alerts.