Oracle BI EE 10.1.3.3/2 – Merging Repositories – Substitute for Import From Repository – 2 way Merge with No Parent – Part 2

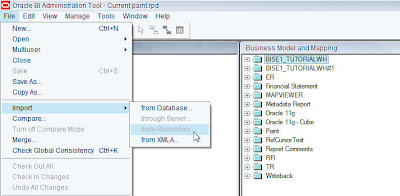
If you look at the comments section of my blog entry here, there are quite a few users who have mentioned that the procedure did not work on their setup. One of the main reasons for that was that the changes being merged was not shown to the end user. Also, the procedure did not work for some of the earlier versions. So, i thought of blogging about another procedure that would basically merge only two repositories. If you had worked on the earlier releases of BI EE ( 7.8 or before versions ), you would have noticed that there was an option called Import from Repository. What this option basically did was it imported the objects from one repository into another. But this has been deprecated from 10.1.3.2 version of BI EE. Now the recommended way of getting one repository objects into another is to do a 2-way merge. Lets look at a step-by-step approach for achieving this. So basically our aim is to combine the contents of 2 repositories into a 3rd repository. The merge process would look like the one shown below
      
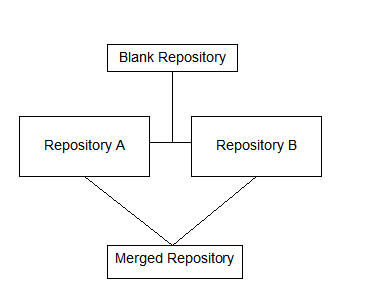
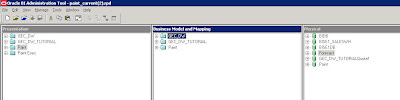
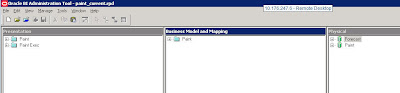
So basically, our idea is to use a blank repository as the baseline repository. Now, in our example we shall be using 2 repositories. One repository would be the default paint repository. The other would be the default bise1 repository. As the first step open up the paint repository in offline mode.
      
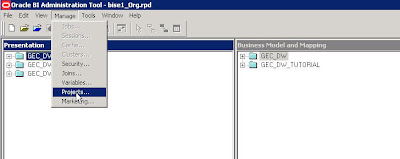
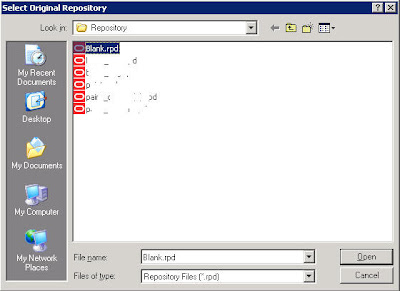
Then click on Merge. Specify a blank repository (create a repository which has no objects) as the original repository.
      
      
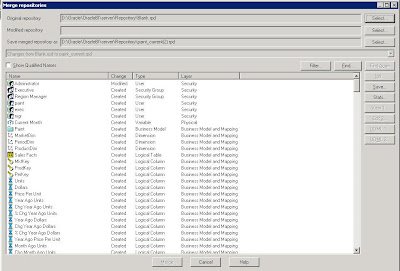
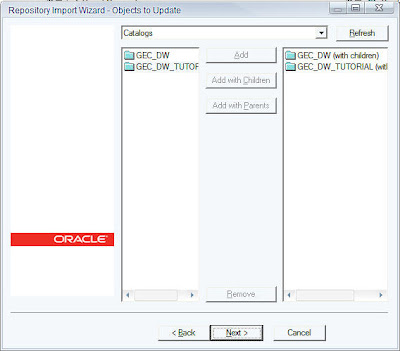
Once this is done, select the bise1 repository as the Modified Repository.
      
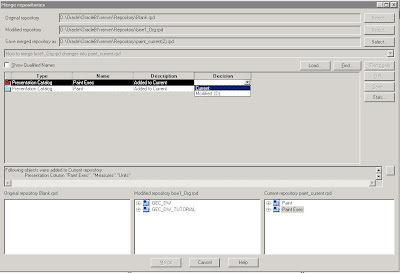
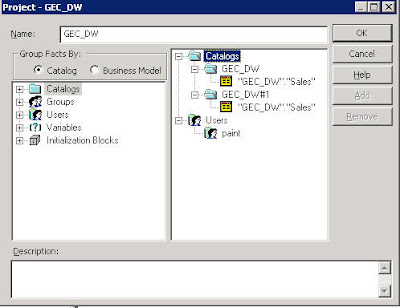
You would basically find the list of presentation catalogs, users, groups etc. In your case you would find either of the 2 descriptions below
Add to Current
Delete from Current
When it is Add to Current, you can choose your decision as Current or Modified(D). If you choose current, the presentation catalog would be added to the repository. Else it would be deleted from the repository. Choose Current as the decision for all the “Added to Current” descriptions.
      
If you have Delete from Current, you would have to decide whether to add the objects to the repository or delete them. Now, click on merge. This should merge both your repositories properly.
      

Oracle BI EE 10.1.3.3/2 – Multi User Development of Repositories (MUD)

I had some time today to put together a simple document for enabling Multi-User Development(MUD) for repositories. Typically when you have many data sources and lots of tables, it would make sense to distribute the repository development work to multiple users. MUD is basically a feature of the BI EE admin tool wherein multiple users can work on the repository at the same time. The concept of Repository Merging was actually introduced in order to facilitate MUD. Lets try to understand the concept of MUD today.
Lets start with the simple diagram below.
      
The above diagram illustrates how the MUD works. In order for the MUD to work following are the pre-requisites
1.   A shared drive to host the Master Repository
2.   All the client machines should have access to the master repository.
3.   All the client machines should have the admin tool installed.
For the MUD to work, the repository that is worked upon by all the users should be kept in a shared directory. This shared directory should be accessible to all the users. In each of the client’s Admin tool, enter the Shared Directory path.
      
Now, open the Master repository in offline mode. The entire concept of MUD revolves around objects called as Projects. So, from within the Admin tool navigate to Manage – Projects.
      
This will open up a project window. Projects are basically subsets of objects within the Admin tool that can be assigned to individual users. So, the idea is to assign different projects to different users. Also, each of these projects can contain one or more Logical Fact tables. As soon as a logical fact table is included all the other dependent objects would automatically be part of the project. Typically when we start with a repository, we would not be having any BM or presentation layers. So, it is recommended that one imports all the physical tables and creates the physical joins in the repository first before implementing MUD. After that we can create dummy BM and presentation layers so that they can be assigned to individual projects. Also, one can assign Users, Init Blocks and Variables to a project.
      
After creating and assigning objects to a project, the next step is to save the master repository in a shared drive. Now, open up a client Admin tool and navigate to File – Multiuser – Checkout. This Check out process does 2 things
1.   Copies the Master repository from the shared drive to the local drive ( This will serve as the local master repository).
2.   Gives you a screen to choose the project that you have the authority to work on.
3.   Creates a subset repository (would ask you to enter the name) which would contain only the selected project related data.
So, basically the idea is to work on the subset repository (like creating/deleting dimensions, hierarchies etc) and then merge the changes back to the local master repository. The merge process will lock the master repository in the shared drive. In order to release the lock one would have to Choose “Publish to Network” which will copy the modified and merged local master repository to the shared drive. The process would be the same for all the other users.

Oracle BI EE 10.1.3.3/2 – Import from Repository – Deprecated 2-Way Merge

As i have said here, the supported way to combine objects in 2 repositories is to use a 2-way merge without Parent. But for users who are new to BI EE and who are used to the “Import from Repository” feature in older releases, there is some good news. This feature still exists in the current release but has been deprecated right from 10.1.3.2. Remember, it is recommended to use a 2-way merge since that will prompt the end user to make the decision while doing the merge. But there are cases, wherein you have 2 repositories which are completely different and you are pretty sure that there are no objects that overlap each other. In such cases, you can still use the Import from Repository feature. By default if you navigate to File – Import – From Repository, you would notice that this would have been disabled by default.
      
In order to enable it, go to Tools – Options – General and enable the Import from Repository option.
      
Now, you should be able to import one repository into another. You would get this warning that this has been deprecated in the current release
      
Lets import the default bise1 repository into the paint repository.
      
But remember, you would not know what objects have been updated/created. This is very risky in situations where you have overlap of repository objects. You can end up losing some data. Always use the 2-way merge. Only if you are very sure about the underlying objects, use the Import from Repository.

Displaying duplicate values in OBIEE reports

Usually when you run a report in OBIEE it would suppress the duplicates by default and this behavior is acceptable in almost all the cases. But I recently came across a request where they wanted to display the duplicate values.
Here is screen shot of my report.
clip_image002
Since the Sales Amount has an aggregation rule sum defined on it, the report sums up the sale amount band groups by brand. I could display all the values for the Sales Amount by removing the aggregation rule from the measure. But this measure needs to have an aggregation rule. Or I could add some other column at the lowest grain.So here is an alternative.
Create a new column in the BMM layer (product table in this case) using an evaluate function.
EVALUATE(‘rownum’ AS INTEGER )
Adding this column in the report would display the duplicate values. You could hide the column as well.
clip_image004clip_image006
If you get this error uncheck the pref_internal_switch_join feature in the DB features in the physical layer.
State: HY000. Code: 10058. [NQODBC] [SQL_STATE: HY000] [nQSError: 10058] A general error has occurred. [nQSError: 46030] Field descriptor id 0 is beyond the maximum field count 0. (HY000)
clip_image008

Dynamic Display Name for Presentation columns

There was a question asked on this post here and I thought of having another post to answers Vik’s question.
Hi carpediemconsulting
Good Artical, Thanks
We have a Similar req at my client, but little bit different.
we have a Dimension, in that we have a hierarchy H1 with Levels, Level1, Level 2 , Level 3 we are implimenting this product for different companies, Lets say comp A, & Comp B,
In Comp ‘A’ we call level 1 as ‘Market’ and in comp ‘B’ we call it as “Location”
can we change these Level1 label dynamically when the user login. FYI . these labels are stored in TABLE
Thanks
Vik
As you can see from the properties of a presentation column you could see that there is a provision to specify a custom display name.
I have two users created in the RPD. USER1 and USER2. My objective is to give a custom display name for a Column (Brand column in the Product Table). User1 would like the display to be USER1 BRAND and user2 USER2 BRAND.
I have created a session variable (BRAND_DISP_NAME) which would be initialized to USER1 BRAND for user1 and USER2 BRAND.
In the properties window for the presentation column brand do the following.
Uncheck use logical table Name check box
Check the Custom Display Name check box
Type in the name of the session variable in the text box. In my case VALUEOF(NQ_SESSION.BRAND_DISP_NAME)
Here is a screenshot.
clip_image002
Now lets see how the column shows up for these 2 users in Answers.
USER 1
clip_image004clip_image006
As shown in the screenshots above the display name for the column “brand” is different for these two users.

Cache management in a OBIEE clustered environment

Let us look at cache management in a clustered environment.
Consider a scenario in which I have two BI servers in a cluster – server A and server B and  I want seed the cache for users who have different data visibility.  A common approach to seed the cache is to use ibots. You could run an ibot as an administrator and  add the users as the recipients  to seed their cache. However, in this case because of the data-level security restrictions,  when you try to seed the cache for a particular user you might run into cache-seeding errors. Only users with administrator privileges in the RPD can seed the cache using ibots.
Another issue is that a request scheduled using ibots may be assigned to any one of the clustered BI servers. Even if a cache entry is made,  it will exist only in the node that processed the request. As a result, we will see a cache hit only if a query gets directed to the same BI server which has the cache entry.
A workaround to these issues is to use the NQCMD command line utility to seed the cache on all the clustered BI servers.  NQCMD needs to be run on all the nodes separately to seed the cache.
First we need to create a non clustered DSN entry in all the nodes in the cluster.
Image-0006
First step would be to purge the cache in all the nodes in the cluster.
Purging all Cache:
Open a text file and enter the following text:
Call SAPurgeAllCache()
Save this file as purgecompletecache.txt
Open another text file and enter the following:
nqcmd -d non_cluster_DSN -u Administrator -p Administrator -s purgecompletecache.txt
Save this file as purgecache.bat
When you execute purgecache.bat all the cache entries will be purged.
Purging Cache for a particular table:
Save the following in a text file:
Call SAPurgeCacheByTable(‘DBNAME’,'CATALOG’,'SCHEMA’,'TABLENAME’)
Call this file in the batch file and execution of the batch file will clear all the cache entries associated with the physical table TABLENAME. Note that the catalog, schema and tablename are  the values in OBIEE and not the name in the database. If the CATALOG value is null then use ”.
Repeat this process on all the nodes and verify that the cache entries have been purged.
The next step is to seed the cache for the different users. The following steps outline the steps involved in this:
Seeding the cache:
Copy the Logical SQL for the request you want to cache from cache manager and paste it into a notepad file.
I have named this notepad file: sql_1.
Now open another notepad file and enter the following text:
nqcmd -d non_cluster_DSN -u EMP4 -p EMP4 -s sql_1.txt -o output.txt
You should use the username and password of a user who has the same data visibility as the users whose cache you want to seed.
Save this file with a .bat extension. I have named it seedcache.bat.
When you run this windows batch file, the the following events occur:
1. call the nqcmd utilty
2. Log into OBIEE server using the non-clustered DSN  with username: EMP4 and password:EMP4
3. Execute the logical sql in file sql_1.txt
4. Write the output in file: output.txt.
Execute this batch file in every node of your cluster and verify that a cache entry has been made in your RPD for user : EMP4
Image-0003

Period Comparison without time series or ago functions.

Recently at a client site we had to connect to some tables in owned by another application and generate some reports for our OBIEE user base. We had no control over the table structures in the external application and we had to generate some time series measures. We couldn’t use the time series wizard or the ago functions provided by OBIEE.
The report had to display all the quarters of the current year and the growth for the same period for each of the quarters.
This is how the repots looks like in a regular table view in answers.
clip_image002
And the picture below shows what the client wanted.
clip_image004
We could have done the same with a complex case expression but we found an alternative which is more elegant and better performing, using pivot table calculations.
First up we need to change the formula for the quarter to the one shown below.
clip_image006
Current year is a repository variable, this could also have been a presentation variable.
And the table view would look like
clip_image008
Now create a pivot table for this with the year on the left and the quarter on the top.
Create 2 calculated items on the year column
The first one (Actuals) as $2 and the second one as $2-$1 (growth) and then hide the details and this would give the sales amt for all the quarters for the current year and the growth.
clip_image010

Letting the users pick joins in OBIEE

The users want to define the joins between tables in answers, when doing adhoc queries. These views are used for real-time reporting and were sitting on top of EBS tables. This requirement was driven by the fact that most of these views could be joined in more than 2 ways depending of the business scenario. In a typical design we would create alias tables to correspond to each of the joins. But in our case the users were not able to define the joins in advance and there is a possibility of the view definitions changing over a period of time. To sum it up the users wanted to simulate a SQL tool with answers, sort of.
clip_image002
In our case View 1 and View 2 could be joined up to 4 different ways and there were quite a few views like that, making the whole aliasing approach cumbersome. One of the developers in the team came up with an idea, though it’s not the perfect solution, but definitely simple and worth mentioning.
First up we extended all the views in the database by adding a dummy column and the values were always 1.
View 1
Col1Col2Col3Col4Dummy
1
1
View2
Col1Col2Col3Col4Dummy
1
1
The physical layer in the RPD would have the join between the views as View1.dummy = View2.Dummy. There is nothing special about the BMM layer, the usual and the same with the presentations layer.
Now comes the answers part. If I were to run a query between the 2 views without any filters in the query the results would not make any since the join is View1.dummy = View2.Dummy.
Let’s say for query 1 I want to join on View1.col1 = View2.col1. Here are the steps.
Put a filter on View1.Col1. (View1.Col1 = value1)
Convert that filter to SQL
Equate View1.Col1 to View2.Col2 in the filter SQL.
clip_image004
This will have your physical queries appended by 2 join conditions 1) which is defined in the RPD(View1.dummy = View2.Dummy) and 2) View1.col1 = View2.col1 .
You could define any joins in a similar fashion. One serious limitation is that the joins are always inner joins.

Dynamic Data security in OBIEE

Here is an interesting scenario that I came across recently. The client has 2 hierarchies based on cost centers, Management and P&L. The business push behind this was that lot of users had dual roles in terms of how they look at expenses.Both the hierarchies had cost center at the lowest level and the same number of levels in the hierarchy. The differences were 1) users would have access different set of cost centers in both hierarchies (not necessarily mutually exclusive) 2) roll ups for the cost centers would be different in both hierarchies. The business had a couple of requirements around this.
1) The users should be able to pick the hierarchy that they would like to view the report by.
2) When the user flips between the hierarchies the security applied should change accordingly, ie if they are viewing the report by the P&L hierarchy then the P&L security should be applied and if they pick management then Management hierarchy security should be applied.
Here is a very simplified version of how we implemented the solution.
The security profile table
HierarchyUser_idCost_center
P&LUSER11
P&LUSER12
P&LUSER13
P&LUSER14
MGMTUSER13
MGMTUSER14
MGMTUSER15
MGMTUSER16
MGMTUSER17
User1 has access to cost centers 1-4 in the P&L hierarchy and 3-7 in the Management Hierarchy.
Here are the 2 hierarchy tables for this example.
HierarchyCost_centerLevel2Level1
P&L1P&L LVL2 1P&L LVL1 1
P&L2P&L LVL2 1P&L LVL1 1
P&L3P&L LVL2 1P&L LVL1 1
P&L4P&L LVL2 1P&L LVL1 1
P&L5P&L LVL2 2P&L LVL1 1
P&L6P&L LVL2 2P&L LVL1 1
P&L7P&L LVL2 2P&L LVL1 1
HierarchyCost_centerLevel2Level1
MGMT1MGMT LVL2 1MGMT LVL1 1
MGMT2MGMT LVL2 1MGMT LVL1 1
MGMT3MGMT LVL2 1MGMT LVL1 1
MGMT4MGMT LVL2 2MGMT LVL1 1
MGMT5MGMT LVL2 2MGMT LVL1 1
MGMT6MGMT LVL2 2MGMT LVL1 1
MGMT7MGMT LVL2 2MGMT LVL1 1
I have an expenses fact table where the cost center is a key.
clip_image002
Now lets see how this is modeled in the RPD.
Physical Layer Joins
I have aliased the security profile table as Sec Profile PL and Sec Profile Mgmt
clip_image004
There is a similar join between the Sec Profile Mgmt table with the Management Hierarchy table.
Here is how the BMM layer is done.
The cost center table will have 2 logical sources and each of these logical sources would have an inner join to the appropriate sec profile alias table.
clip_image006clip_image008
All the columns are mapped to both the logical sources.
Now we need to define appropriate fragmentation content for these 2 logical sources. Here is the Mgmt source
clip_image010
Add the user_id column to the logical table and map it to the appropriate logical sources.
Now all that’s left is to go to the relevant group in the RPD and add the security filter.
clip_image012
Create reports with the hierarchy as one of the columns and set filter to a presentation variable
clip_image014
Also create a prompt and set a presentation variable in the prompt.
clip_image016
Throw the 2 in a dashboard and lets see how the reports work for USER1
clip_image018clip_image020
Its very important to have the filter on the hierarchy column in every query otherwise you would end up overstating the numbers.