Showing posts with label Subject Area. Show all posts

GO URL request navigation between different subject areas

I this post I'll show how to navigate with GO URL between different subject areas (presentation areas, one presentation area is equal to one BMM area).

Example one:

Navigation is between Normal model subject area and Normal model subject area two, which has only renamed logical tables and columns, the physical source is the same for both areas.

BMM subject areas:


Presentation area:


The source report that uses Normal model subject area:


The target report that uses Normal model subject area two:


Column GO URL to Report 26 on the source report:


P2 (target report column) -> PROD.PR_CAT.
P3 (source report column) -> PRODUCTS.PROD_CATEGORY.

Test

I put the source report on the dashboard page.

We will navigate from the third row (Peripherals and Accessories) from the GO URL to Report 26 column:


Before navigation, NQQuery.log for this report:


When navigate to the target report we get:


NQQuery.log for this (target) report:


We see that navigation works fine in this example, when we have navigation between different subject areas that use the same physical tables, the filter is applied on the second report column (logical PROD.PR_CAT, physical PRODUCT.PROD_CATEGORY).

Example two:

Navigation is between Normal model subject area and Normal model subject area three, which has new the physical source, table CATEGORIES with column PROD_CATEGORY, our target column for navigation.

BMM subject areas:


Presentation area:


The source report is the same as in the previous example that uses Normal model subject area.

The target report that uses Normal model subject area three:


Column GO URL to Report 26 subject area three on the source report:


P2 (target report column) -> CATEGORIES.PROD_CATEGORY.
P3 (source report column) -> PRODUCTS.PROD_CATEGORY.

Test

We will navigate from the third row (Peripherals and Accessories), from the GO URL to Report 26 subject area three column:


When navigate to the target report we get:


NQQuery.log for this (target) report:


We see that navigation works fine in this example, when we have navigation between different subject areas that use different physical tables, the filter is applied on the second report column (logical CATEGORIES.PROD_CATEGORY, physical CATEGORIES.PROD_CATEGORY). 
SA System - automatic setting of user profiles

What is it?
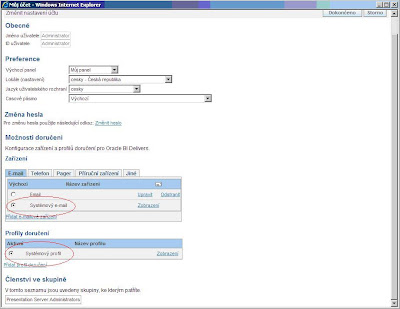
SA Presentation System is a system catalog, which can give basic information about the user (name, groups, contacts, ...) directly prezentačnímu server. This information can usefully be used for example in the component BI Delivers. Example of Using BI Delivers can send emails. Because the definition iBotu (BI Delivers process) are selected as recipients of the analytical system users, all users must assign an email address. This happens by default so that every user after logging into the system will create their own profile with email address in the "My Account". It is therefore a setting that does not have administrator control. Definition of system catalog "SA System" is the way to setting up user profiles to create and maintain bulk. How? Using the SA System catalog is very simple. It should create a presentation in metavrstvě catalog with a specific name and specific structure of the records .Presentation catalog is, of course, be derived from the Business Model, respectively. tables in the database. Here, the individual solutions may diverge, depending mainly on how it is resolved in the system of authorization and authentication. Usually, but start from a database table in which we hold the following information (for sending mail):


  • user name
  • e-mail address
  • email format (html / plain text)
  • priority email

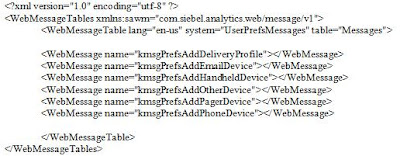
These columns should be prepared to link up to the presentation catalog to the corresponding columns. For other columns that do not use in our example is set by the Business Model initialization values ​​(konstatnty).Checking the result if everything is configured correctly in the "My Account" to each user profile, a new system and method of delivery (system e- mail system profile). Then you just make iBot, specify a list of recipients and the process will deliver a report or dashboard to our defined e-mail address. Tip at the end To have absolute control over user profiles, users should disable the option to add their own profiles and their activation. Variant 1) Setting the modes of delivery and profiles can be disabled in the menu - Administration - Manage privileges - My Account - Change Delivery Options. In this case, but the user can check system-requisites set profile - corresponding part in the "My Account" disappear. Option 2) You can only disable the display of the links in the Account Settings "Ad Delivery Profile" or "Ad Device". We achieve this by creating your own XML file, which suppress the default view of the required components: The XML file to save the $ ORACLE_BI \ web \ msgdb \ customMessages \ and restart the Oracle BI Presentation Server.


Oracle BI EE 10.1.3.3/2 – SA System Subject Area – Autoloading Profiles And Bursting


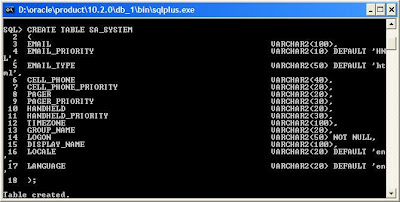
Those users who have worked with Siebel Analytics 7.7 or above, they would be aware of a special subject area called SA System subject area that was necessary to set up Delivers. But with the advent of new releases(10.1.3.3 and above), SA System subject area is not mandatory any more. But still SA System Subject area can be very useful in a lot of scenarios. One of the major uses of this special subject area is that, by setting this up one can automatically populate the Delivery Profiles of all the users. If this is not setup, one would have to manually go into My Account section of each and every user and then set it up. For example, a typical use case is, you would be having the list of users and their corresponding email ids in an excel file. You do not want the users to manually go and enter their email ids. In such a case, just setup the SA System subject area, then all the users would automatically get their email ids, phone, pagers etc automatically assigned to their profiles. Today, we shall see how to go about setting this subject area. Lets start with a simple table script that would help us to store all the Users, their corresponding Groups and also their email ids, pager and phones. Remember, SA System subject expects you to specify all the shown columns below.
  1. CREATE TABLE SA_SYSTEM  
  2. (  
  3. EMAIL VARCHAR2(100),  
  4. EMAIL_PRIORITY VARCHAR2(10) DEFAULT ’HNL’,  
  5. EMAIL_TYPE VARCHAR2(50) DEFAULT ’html’,  
  6. CELL_PHONE VARCHAR2(40),  
  7. CELL_PHONE_PRIORITY VARCHAR2(20),  
  8. PAGER VARCHAR2(20),  
  9. PAGER_PRIORITY VARCHAR2(30),  
  10. HANDHELD VARCHAR2(20),  
  11. HANDHELD_PRIORITY VARCHAR2(30),  
  12. TIMEZONE VARCHAR2(100),  
  13. GROUP_NAME VARCHAR2(20),  
  14. LOGON VARCHAR2(50) NOT NULL,  
  15. DISPLAY_NAME VARCHAR2(100),  
  16. LOCALE VARCHAR2(20) DEFAULT ’en’,  
  17. LANGUAGE VARCHAR2(20) DEFAULT ’en’  
  18. )  
CREATE TABLE SA_SYSTEM
(
EMAIL VARCHAR2(100),
EMAIL_PRIORITY VARCHAR2(10) DEFAULT 'HNL',
EMAIL_TYPE VARCHAR2(50) DEFAULT 'html',
CELL_PHONE VARCHAR2(40),
CELL_PHONE_PRIORITY VARCHAR2(20),
PAGER VARCHAR2(20),
PAGER_PRIORITY VARCHAR2(30),
HANDHELD VARCHAR2(20),
HANDHELD_PRIORITY VARCHAR2(30),
TIMEZONE VARCHAR2(100),
GROUP_NAME VARCHAR2(20),
LOGON VARCHAR2(50) NOT NULL,
DISPLAY_NAME VARCHAR2(100),
LOCALE VARCHAR2(20) DEFAULT 'en',
LANGUAGE VARCHAR2(20) DEFAULT 'en'
)
     
Assume that we have 2 users <b>Administrator and Sample</b> in our repository. So, lets enter all their relevant details into the above table.
  1. INSERT INTO SA_SYSTEM(EMAIL, GROUP_NAME, LOGON, DISPLAY_NAME) VALUES (<a href=”mailto:’venkatakrishnan.janakiraman@oracle.com’,'Administrators’,'Administrator’,'Administrator’“>’venkatakrishnan.janakiraman@oracle.com’,'Administrators’,'Administrator’,'Administrator’</a>);  
  2. INSERT INTO SA_SYSTEM(EMAIL, GROUP_NAME, LOGON, DISPLAY_NAME) VALUES (<a href=”mailto:’krisvenky83@gmail.com’,'Administrators’,'Sample’,'Sample’“>’krisvenky83@gmail.com’,'Administrators’,'Sample’,'Sample’</a>);  
  3. COMMIT;  
INSERT INTO SA_SYSTEM(EMAIL, GROUP_NAME, LOGON, DISPLAY_NAME) VALUES (<a href="mailto:'venkatakrishnan.janakiraman@oracle.com','Administrators','Administrator','Administrator'">'venkatakrishnan.janakiraman@oracle.com','Administrators','Administrator','Administrator'</a>);
INSERT INTO SA_SYSTEM(EMAIL, GROUP_NAME, LOGON, DISPLAY_NAME) VALUES (<a href="mailto:'krisvenky83@gmail.com','Administrators','Sample','Sample'">'krisvenky83@gmail.com','Administrators','Sample','Sample'</a>);
COMMIT;
Lets look at what each of the above columns do
EMAIL – Stores the email addresses of the user.
EMAIL_PRIORITY – Can take 3 values. ‘H’ for High, ‘N’ for Normal, ‘L’ for low. ‘HNL’ means High, Low and Normal. You can use these in any combination.
EMAIL_TYPE – Can take ‘html’ or ‘text’. This primarily tells whether the email client supports html or only text.
CELL_PHONE – Cell phone details
CELL_PHONE_PRIORITY – Same as EMAIL_PRIORITY
PAGER – Pager details
PAGER_PRIORITY – Same as EMAIL_PRIORITY
HANDHELD – Handheld details
HANDHELD_PRIORITY – Same as EMAIL_PRIORITY
TIMEZONE – This can be Null. Basically tells the timezone of the user.
GROUP_NAME – The actual GROUPs to which the Logon user belongs.
LOGON – User Login Name
DISPLAY_NAME – User Display Name
LOCALE – Default it to ‘en. It specifies the user Locale.
LANGUAGE – Default it to ‘en’. It specifies the user Language.
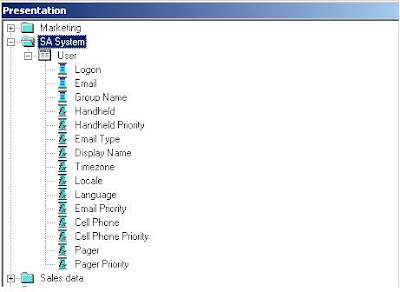
Now, import the above created table into the repository and design your BM and Presentation Layers. You should rename the Presentation Layer columns to the one shown below.
Cell Phone
Cell Phone Priority
Display Name
Email
Email Priority
Email Type
Group Name
Handheld
Handheld Priority
Language
Locale
Logon
Pager
Pager Priority
Time Zone
If you use any other names, SA System subject area would not work.
     
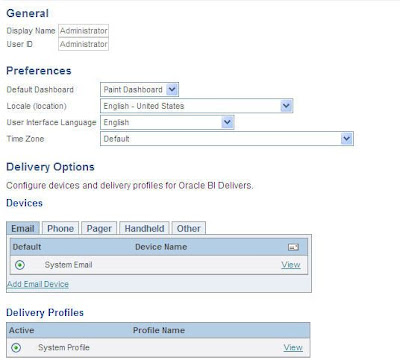
Once this is done restart the presentation services. Now login as Administrator and go to Settings -> My Account. You would notice that the delivery profile would automatically be populated and also the email id would also have been associated to the profile. Same would be the case for the Sample user.
     
     
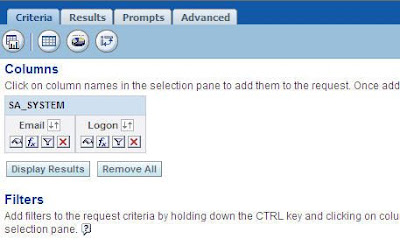
Sometimes this can be very useful. But always remember, if any user goes and modifies their delivery profile, that would take precedence over the SA System Subject area.. One other advantage of using this SA system subject area is that you can use this to do email bursting of reports. For example, in most cases, not every user would have the delivery profile created. In such a case, just load up the SA System subject area and then assign the email ids to the users. Just create a simple report on the SA System subject area to have a display on the LOGON names.
     
Use this in the conditional request and pass the LOGON field to the list of recipients.
     
This would automatically do the bursting to all the users. This would be very handy while doing mass email deliveries