The current global go script I have not only produces one ‘go’ button for all prompts on a page; but, it also has code to create required fields and required field validations. The one thing that was brought to my attention was that my current script treated the prompt collective on the page to have dashboard scope. To read about prompt scope, read here. So whether or not you had one or all set for page scope the global go button disregarded and made it act like dashboard scope. So that any selections on the page would carry over on other dashboard pages. So I have updated my script so that it will use the scope from the first prompt as the entire pages scope for its prompts. I have added and updated the script on my 2nd blog posting which had the new required field validation, here. For the instructions, on how to setup look here.
Scope of Dashboard Prompts
Some may think that the scope of the prompts do not work and are broken; but, they do work and are not broken! You just need to know what it really does. So when you specify a dashboard prompt as scope-> ‘page’, what this does is say that any selections made for this prompt will not be used to set other prompts within the dashboard. When you specify a dashboard prompt’s scope-> ‘dashboard’, this says that any selection of this prompt will be reflected in other prompts within the dashboard. I think people get it confused and think that the ‘page’ scope shields the prompt from receiving selections from other ‘dashboard’ scope prompts; but, it does not. The scope is only there to specify if the selection within the prompt will be local (page) or global (dashboard).
So for any issues where your prompt is still being set by other page prompts within the dashboard, the reason is due to the other prompt having scope-> ‘dashboard’. If you do not want this behavior within the dashboard, set all the prompts’ scope to ‘page’. So with this knowledge you will know when to set a prompt to ‘dashboard’ or ‘page’. ‘Overview’ or ‘Summary’ dashboard pages are a good example of using ‘dashboard’ scope for its prompts, while the other pages in the dashboard are set for ‘page’ scope.
Creating New Web Catalog
I have been seeing a lot where people take paint or samplesales webcat and either cloning it or modifying it to make a new webcat. This has its issues and problems. For one, you inherit all the users and privileges that are there, especially if you were using and modifying this before you decided that it was not a good idea and that you should have a webcat unique for your area or application.
Why do all that work? There is a faster and better way to make a new webcat. Fastest and easiest way to make brand new webcat:
1. Modify ORACLEBIDATA_HOME/web/config/instanceconfig.xml. Change location of webcat to that of the new webcat. For my example, I changed from samplesales to testCat.
E:/OracleBIData/web/catalog/testCat</CatalogPath>
2. Restart Presentation Services
Thats it! Simple right. Well this is what is happening when you restart presentation services. Presentation Services looks at configuration and see that the webcat to use is testCat. It looks for webcat in the location specified to load. If it does not find it, it creates one for you.
Calculating grand total as a column in Table View
Calculating grand total column or % of grand total is easy in pivot table view. But how can I create the same in a table view? Well in table view you can create a grand total row with the table view options! But, that is not what we want. We want it so that you either have grand total as a column or % grand total. To do this I will be using sample sales to demonstrate.
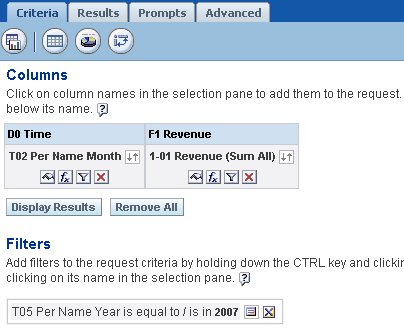
First we create the base report. This base report will have the Month column and the monthly revenue.
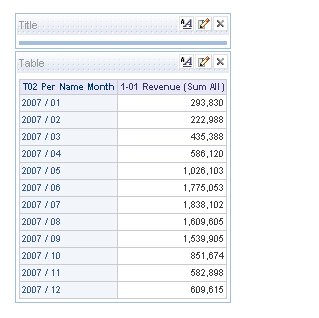
The result of this base report is:
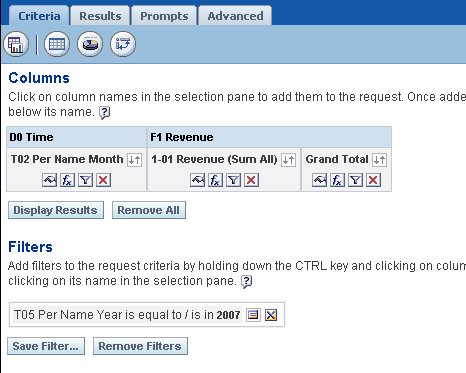
Now we want to include the grand total as a column for each row. To do this we create a new column called grand total.
With expression:
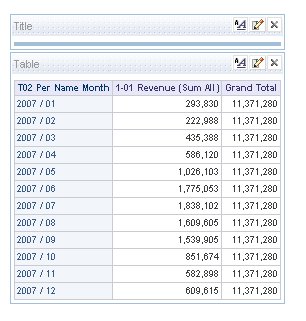
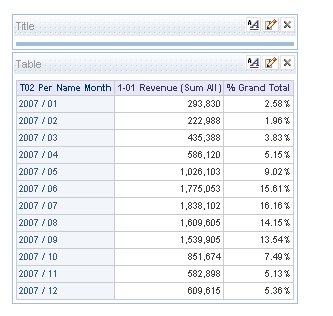
See what we did! We wrote the expression formula to sum() the metric. This metric is already defined in the metadata or BMM layer as a metric with aggregation rule of sum. So by wrapping or using this metric within a sum() within the report, we are telling the BI Server we want the sum of the aggregated sum(s) or pretty much the Grand total. Here are the results:
Now let’s say we do not want to show the Grand Total column per row but the actual % of Grand Total. Here we change the Grand Total columns column heading and expression:
Note: We also needed to change the column properties Data Format to properly show the data in the correct format.
Here are the results.
So there is how you create a “Grand Total” or “% grand total” in table view.
Use of Evaluate function for Analytics Function (Oracle)
In those rare instances, there is a necessity to utilize the EVALUATE function within OBIEE. Most cases the use is to utilize a database function that is not available, yet, by OBIEE; but, is available within the database reporting from. For example, an analytic function within Oracle. Use of the EVALUATE function will allow to function ship this through the physical sql. There is not much in Oracle’s documentation that goes over this, whether it be EVALUATE, EVALUATE_AGGR or particularly EVALUATE_PREDICATE.
So playing around with this functionality for an associate the other day, I did notice something quite interesting. When using the EVALUATE function on an Oracle Analytic function and using physical tables and columns for the bind params you will see something like this in the physical SQL:
State: HY000. Code: 388. [NQODBC] [SQL_STATE: HY000] [nQSError: 10058] A general error has occurred. [nQSError: 17001] Oracle Error code: 30483, message: ORA-30483: window functions are not allowed here at OCI call OCIStmtExecute. [nQSError: 17010] SQL statement preparation failed. (HY000)
The physical sql will look something like this:
select distinct D1.c3 as c1,
D1.c1 – D1.c2 as c2
from
(select sum(case when T1595.METRIC_CODE = ‘ACTUAL’ then T1558.METRIC_VALUE end ) as c1,
sum(case when T1595.METRIC_CODE = ‘BUDGET’ then T1558.METRIC_VALUE end ) as c2,
cast(ROW_NUMBER() OVER (PARTITION BY T1558.METRIC_VALUE ORDER BY T1558. METRIC_VALUE asc) as DOUBLE PRECISION ) as c3
from
ZFCT T1558 ,
ZMETRIC_DIM T1595
where ( T1558.METRIC_WID = T1595.WID and (T1595.METRIC_CODE in (‘ACTUAL’, ‘BUDGET’)) )
group by cast(ROW_NUMBER() OVER (PARTITION BY T1558.METRIC_VALUE ORDER BY T1558. METRIC_VALUE asc) as DOUBLE PRECISION )
) D1
order by c1
As you can see the analytic function, or window function, is within the inner query and part of the group by. This makes sense, since this is not an aggregate function. But these functions are not allowed here. So what to do, in order to get this analytic function to be called after the aggregations, aka in the outer query!? Well create the logical column expression to “Use Existing logical columns as the source”! But this will only work if you reference a metric logical column or a metric column with an aggregation rule applied, or you will get the same error and physical sql created. Now by referencing a logical column which has an aggregation rule set will result in the following physical query:
select distinct cast(ROW_NUMBER() OVER (PARTITION BY D1.c1 - D1.c2 ORDER BY D1.c1 - D1.c2 asc) as DOUBLE PRECISION ) as c1, D1.c1 - D1.c2 as c2from (select sum(case when T1595.METRIC_CODE = 'ACTUAL' then T1558.METRIC_VALUE end ) as c1, sum(case when T1595.METRIC_CODE = 'BUDGET' then T1558.METRIC_VALUE end ) as c2 from ZFCT T1558 , ZMETRIC_DIM T1595 where ( T1558.METRIC_WID = T1595.WID and (T1595.METRIC_CODE in ('ACTUAL', 'BUDGET')) ) ) D1order by c1Since we are referencing a logical column with an aggregation rule set, it makes sense it is created this way. The aggregation needs to be applied first, since you specified this aggregation column as a bind param. Then the EVALUATE can be performed afterwards or in our case within the outer query which is what we want.
Lesson learned, when using advanced functionality or for that matter anything look at the physical query created and make sure that is what you want and intended when working with RPD metadata.
Lessons in Filters and the ‘is prompted’ operator
It has been a long time, couple of months, since I last posted. But busy beaver that I am, took me away from blogging. Anyways, I got a breather and will add-on.
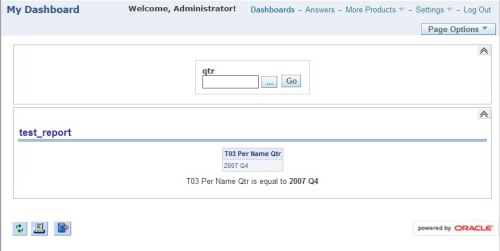
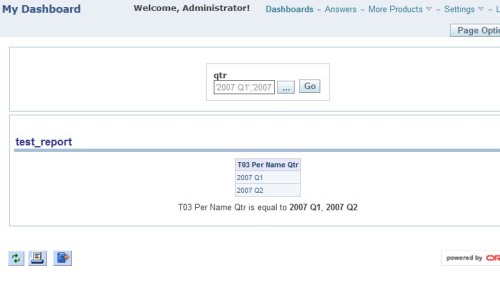
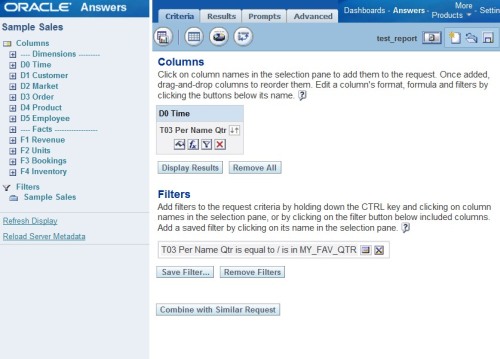
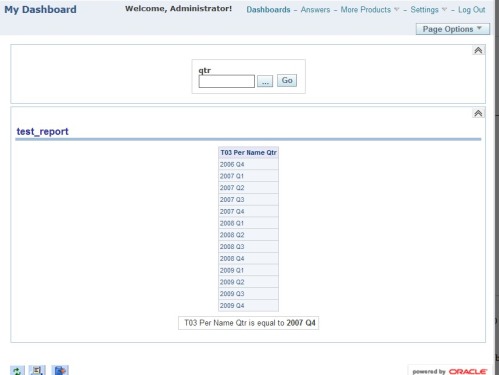
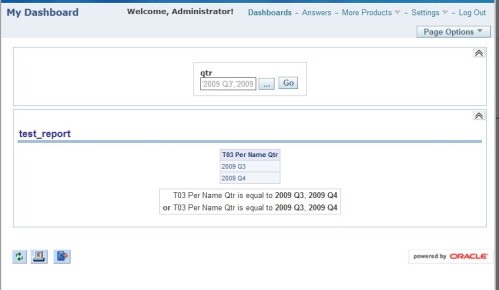
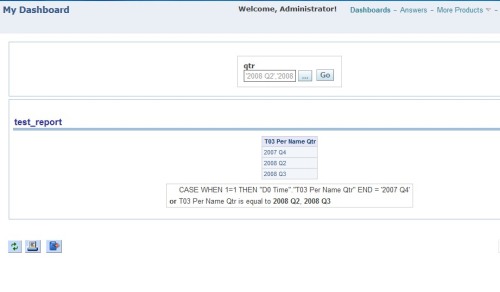
Filters and the ‘is prompted’ operator. Many might think they know how this works and get shocked when things just don’t quite work out the way they do. For instance lets say for some reason, you created an answers request which has ‘QTR’ filtered for a static value, lets say ’2007 Q4′. This report then is pretty static right. It is a report for only that given quarter. Add this to a dashboard page which has a prompt set for same ‘qtr’ field. And play around with selecting values and submitting it. What, the report changes!!! “How can this be, I did not set that field to ‘is prompted’ operator!” As you scratch your head and ponder what has just happened. Well it appears that adding static filters to a report and adding to a dashboard with same field filtered does the following. If no values are selected, the report will always be for ’2007 Q4′. But when the user selects different quarters, the static (default) value will be overwritten with the users selections. So the prompted values over rule any static filters added. Unless of course, how Nag commented below and reminded me, the criteria filter protection option allows the user/developer to protect the filter from this overwriting rule from dash prompts.
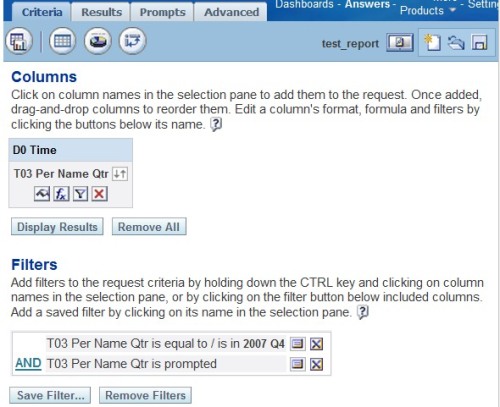
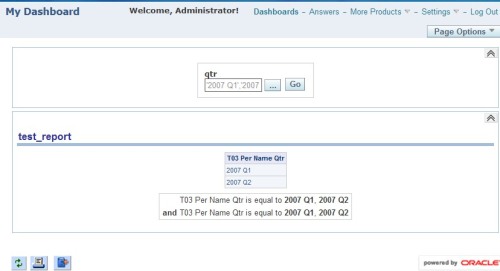
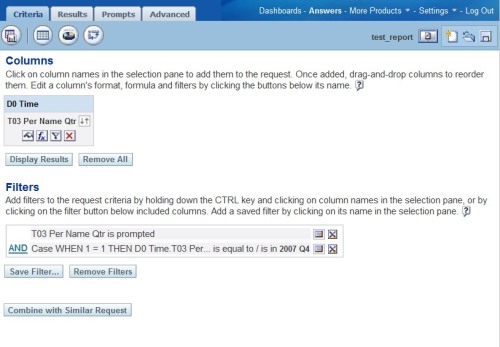
Now lets say we add two filters to same said report for same field ‘qtr’. One is for static value ’2007 Q4′ and the other is for ‘is prompted’. You might think that the report will now correct itself, that is in your mind, and filter by the static value ‘AND’ the selected prompted values. WRONG! The prompted values will now be in both filter criteria as shown below with the filter view.
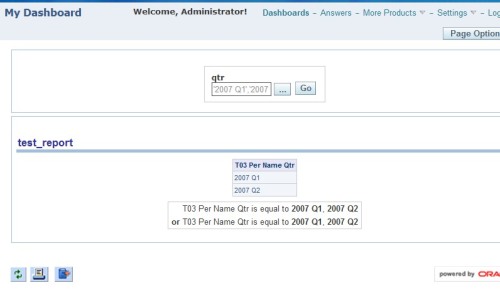
Changing the filter criteria logic to ‘OR’ does not help either. As seen here:
Now lets see if setting the filter criteria to a variable, lets say a repository variable. What happens now? Same thing! The filter’s bound values will be overwritten by selected value(s) from the prompt.
Now how to get around this. Well, prompts replace the bound values by the fields they are representing. For our example qtr field. We can fake this or alter the behavior either by changing the prompt expression or filter expression as easily as:
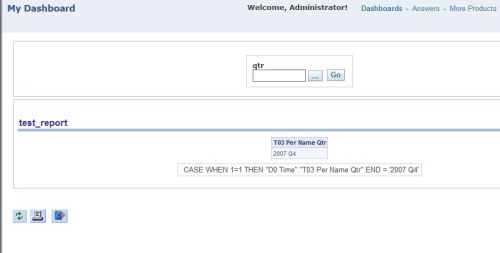
case when 1=1 then qtr end = ’2007 Q4′ and keeping the other filter is prompted. Since the expression for the filter is just not ‘qtr’ anymore it will not be overwritten. As follows:
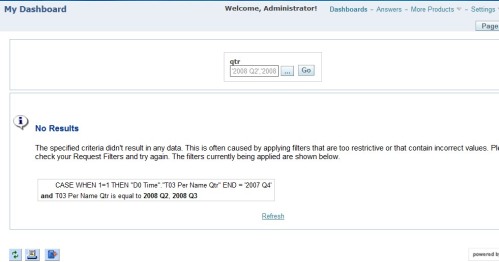
This was done using ‘AND’ logic. We just change the logic to ‘OR’ and we will get the static value and the selected values.
So remember or think about this when you have a filter not working quite like you expect it to. This will give you more options in your filtering and prompting. But please keep in mind whatever you use in the filter, like the case statement I used as example goes to the DBMS in the predicate and if that field is indexed, the index will no longer be used for that predicate.
Required Field Validation: Addition to the Global “Go” Button
I have been asked to create custom functionality whereby certain dashboard prompts are required, and the user should not be able to continue until all required fields are selected before they can query. So I ventured out and created the following script below to do just that. This script is in addition to the ‘Global’ Go button, or what I referred to in a previous post as the ‘Custom’ Go button. What this script does is allow the developer to specify which prompt fields they would like to be required. If any of the fields are not populated by the user an alert/warning box will popup specifying which fields are required in which they did not populate. This is done in one alert window instead of multiple in order to not be annoying and done correctly. The rest of the javascript which pulls the data and posts to the presentation server will not be fired, thus the request is blocked until all required fields are populated.
The script is here and the description/breakdown follows:
<script> function GlobalGo(){
try{
var aElm = document.getElementsByTagName(‘table’);
var tTableArray = new Array();
var k = 0;
try{
var aElm = document.getElementsByTagName(‘table’);
var tTableArray = new Array();
var k = 0;
//Required Field validation variables
var aSpanElm = document.getElementsByTagName(‘span’);
var aReqFields = new Array();
var oneTimeValExists = ‘N’;
//var oneXXXValExists = ‘N’;
var sCaption;
var errMsg = ”;
var i = 0;
var aDivElm = document.getElementsByTagName(‘div’);
var scopeId;
var scopeIndex;
var sViewId;
var aSpanElm = document.getElementsByTagName(‘span’);
var aReqFields = new Array();
var oneTimeValExists = ‘N’;
//var oneXXXValExists = ‘N’;
var sCaption;
var errMsg = ”;
var i = 0;
var aDivElm = document.getElementsByTagName(‘div’);
var scopeId;
var scopeIndex;
var sViewId;
//BEGIN ********** DEVELOPER(s): Add Required Fields here
aReqFields[0] = ‘Brand’;
aReqFields[1] = ‘Region’;
//END **********
aReqFields[0] = ‘Brand’;
aReqFields[1] = ‘Region’;
//END **********
//Get Captions and Controls to check for required fields/values
for(var a=0; a<aSpanElm.length; a++){
for(var a=0; a<aSpanElm.length; a++){
//Get Caption
if(aSpanElm[a].className==’GFPCaption’){
sCaption = aSpanElm[a].firstChild.data;
}
if(aSpanElm[a].className==’GFPCaption’){
sCaption = aSpanElm[a].firstChild.data;
}
//Check if required value exists
if(aSpanElm[a].className==’GFPControl’){
if(aSpanElm[a].className==’GFPControl’){
var aInput = aSpanElm[a].getElementsByTagName(‘input’); // multi-select and text boxes
var aOption = aSpanElm[a].getElementsByTagName(‘option’); // dropdown
var aOption = aSpanElm[a].getElementsByTagName(‘option’); // dropdown
//Check if a required field
for(var b=0; b<aReqFields.length; b++){
if(sCaption==aReqFields[b]){
var hasValue = ‘N’;
for(var b=0; b<aReqFields.length; b++){
if(sCaption==aReqFields[b]){
var hasValue = ‘N’;
//Check if multi-select or text box with caption has value
for(var c=0; c<aInput.length; c++){
for(var c=0; c<aInput.length; c++){
if(aInput[c].value.length > 0){
hasValue = ‘Y’;
}
}
hasValue = ‘Y’;
}
}
//Check if dropdown with caption has value
for(var c=0; c<aOption.length; c++){
for(var c=0; c<aOption.length; c++){
if(aOption[c].selected && aOption[c].value.trim().length > 0){
hasValue = ‘Y’;
}
}
hasValue = ‘Y’;
}
}
//if Value does not exists add to errMsg
if(hasValue==’N'){errMsg = errMsg+’* ‘ + aReqFields[b] +’ is a Required Field!\n’;}
}
} //EndFor required Fields
}
} //EndFor required Fields
//BEGIN ********** DEVELOPER(s): Add Time Fields here
//check if time field
if(sCaption==’Fiscal Period’ || sCaption==’Fiscal Week’ || sCaption==’Dates’|| sCaption==’Year’){
for(var c=0; c<aInput.length; c++){
//check if time field
if(sCaption==’Fiscal Period’ || sCaption==’Fiscal Week’ || sCaption==’Dates’|| sCaption==’Year’){
for(var c=0; c<aInput.length; c++){
if(aInput[c].value.trim().length > 0){
oneTimeValExists = ‘Y’;
}
}
} //Endif check time field
//END **********
oneTimeValExists = ‘Y’;
}
}
} //Endif check time field
//END **********
//BEGIN ********** DEVELOPER(s): This is template check for ‘OR’ed fields or (At Least one)
//check if time field
//if(sCaption==’Caption1′ || sCaption==’Caption2′ || sCaption==’Caption3′){
// for(var c=0; c<aInput.length; c++){
//
// if(aInput[c].value.trim().length > 0){
// {Need to add one time exists variable here} = ‘Y’;
// }
// }
//} //Endif field
//END **********
//check if time field
//if(sCaption==’Caption1′ || sCaption==’Caption2′ || sCaption==’Caption3′){
// for(var c=0; c<aInput.length; c++){
//
// if(aInput[c].value.trim().length > 0){
// {Need to add one time exists variable here} = ‘Y’;
// }
// }
//} //Endif field
//END **********
} //Endif GFPControl
} //EndFor Caption and Controls
} //EndFor Caption and Controls
if(oneTimeValExists==’N'){errMsg = ‘* At least one time field is Required!\n’+errMsg;}
//{Add same if block above for each ‘At least’ that you created with errmsg}
//{Add same if block above for each ‘At least’ that you created with errmsg}
if(errMsg != ”){
alert(errMsg);
return;
}
alert(errMsg);
return;
}
for(var i=0; i<aElm.length; i++){
if(aElm[i].className==’GFPBox’){
tTableArray[k] = document.getElementById(aElm[i].id);
k++;
}
} //EndFor Get Prompt Values to send in Post
if(aElm[i].className==’GFPBox’){
tTableArray[k] = document.getElementById(aElm[i].id);
k++;
}
} //EndFor Get Prompt Values to send in Post
//Get the sViewId in order to set the pages prompt scope
for(var f=0; f<aDivElm.length; f++){
scopeId = aDivElm[f].id;
scopeIndex = scopeId.indexOf(“Scope”);
if(scopeIndex != -1){
sViewId = scopeId.substring(0, scopeIndex);
//alert(sViewId);
break;
}
}
for(var f=0; f<aDivElm.length; f++){
scopeId = aDivElm[f].id;
scopeIndex = scopeId.indexOf(“Scope”);
if(scopeIndex != -1){
sViewId = scopeId.substring(0, scopeIndex);
//alert(sViewId);
break;
}
}
GFPDoFilters_samvi(sViewId, tTableArray, true);
}
catch(e){alert(‘XXX ‘ + e);}
}
catch(e){alert(‘XXX ‘ + e);}
}
String.prototype.trim = function() {
return this.replace(/^\s*|\s*$/, “”);
}
</script>
return this.replace(/^\s*|\s*$/, “”);
}
</script>
<div align=”left”><a href=”#” onclick=”javascript:GlobalGo();”>Go</a></div>
<div align=”left”><a href=”#” onclick=”return
PersonalizationEditor.removeDefaultSelection(false) “>Clear</a></div>
PersonalizationEditor.removeDefaultSelection(false) “>Clear</a></div>
Here are the notes:
- The section in red: This is where the developer will add the required fields into the array. Each field added needs to increment the array index or it will over write. The names put in the required field area are the Dashboard prompt captions.
- The sections in blue: This section is for the time field validation. This checks that at least one time field is populated with data. It also highlights the errMsg used.
- The sections in purple: This is where a developer can use as a template to create the scenario like time where ‘at least’ one field needs to be used.
- The sections in green: This is the additional code which sets the prompts’ scope for the page to the first prompt’s scope. So if the first prompt’s scope is page, all the prompts for the entire page will share the same scope else the entire pages prompts use dashboard scope.
Here is a screen shot of it working within SampleSales. One of the required fields is selected (Brand). And as you can see the alert is shown signifying to the user that ‘at least one time field’ and ‘Region’ are required. The report is not fired for these prompts until all required validation is met.
Until next time…I am currently working on script to stop the dashboard page from firing off report queries on entry. Almost complete this should be added shortly.
-Frank
Presentation Services Access Denied Issue
During migration or copying of presentation web catalogs, some will no doubt come across this error for users when they log in:
access denied for user to path/users/{username}/_portal/dashboard layout
What this generally is saying is that the user does not have access to their dashboard or any dashboard. They could type ‘answers’ after the ‘?’ in the URL and be able to access answers, if they have that privilege. Pretty much what happened is that the migration/copy of the web catalog user folder did not copy the users’ permissions correct.
If you want, you could open the source web catalog that was copied and the web catalog that has the issue via cat manager and see the permissions for that user folder for each web catalog. You should see that the permissions are different.
Now to fix the issue. It is pretty simple, open cat manager and set permissions for the user’s folder to that user. So the user needs at least ‘Change/Delete’ permissions on that folder and have this permission set recursively to sub-items and sub-folders.
And that should fix it.
Subscribe to:
Comments (Atom)
