Showing posts with label Bi Publisher. Show all posts

Email Distribution of Reports using BI Publisher and Discoverer

One of the presentations I’m giving on the Monday at the UKOUG Conference is a joint talk with Mike Durran, the Oracle Discoverer Product Manager. Mike is going to do an update on Discoverer migration and interoperability with Oracle BI Suite Enterprise Edition, and I’m going to show off one of the first fruits of this program, the ability for Discoverer worksheets to be used as a data source for Oracle BI Publisher. Mike and I discussed this feature, and we thought one of the best ways of showing off what this feature can do would be to do something Discoverer historically couldn’t do – schedule reports and distribute them via email. This sort of functionality is built-in to BI Publisher, so whilst Mike’s been putting the slides together, I’ve put together a demo to show off this integration.
The process starts off with a regular Discoverer worksheet, in this case from the Videostore Video Tutorial Workbook. Discoverer is at version 10.1.2.2.0 whilst BI Publisher is at 10.1.3.3 – see this previous posting on getting everything set up for Discoverer / BI Publisher integration.
Then it’s a case of starting up Microsoft Word, connecting to BI Publisher Enterprise as an OID user that has access to both Discoverer and BI Publisher, and then selecting the Discoverer workbook from the “New Template” dialog.
Once that’s done, the BI Publisher Desktop add-in grabs a sample dataset and presents me with a blank template to start working on. I use the Chart Wizard to create a simple bar chart using “Profit Sum” as the measure, “Deparment” as the label and “Year” as the series, like this:
Then I create a crosstab to accompany it, add a title and some commentary text, and drag and drop a logo onto the top right-hand part of the page, like this:
Now if I’m going to display this template in HTML format (as opposed to say, PDF) I need to make sure this image is available on a web server somewhere, so I copy it to the following location:
$ORACLE_BI_HOME\j2ee\home\applications\xmlpserver\xmlpserver\obi_logo.jpg
which makes it available at the URL:
http://winxpvm:7781/xmlpserver/obi_logo.jpg
and I double-click on the image in the Word document, select “Web” from the “Properties” tab, and enter the following code:
I then save the template as an RTF file, and preview it in HTML form. Everything looks fine.
Then, I use the BI Publisher Desktop menu to upload the template to the BI Publisher Enterprise server, and it’s now ready to run within Enterprise. Before I do that though, I log in as an administrator and set up the Scheduler. This involves creating a database schema then passing the connection details to the Scheduler setup wizard, which then creates all the scheduler tables for me.
After I restart BI Publisher so that the new settings can take effect, I go back in as the administrator and set up email delivery. For the purposes of the demo I’m using a freeware email server that installs on Windows called ArgoSoft Mail Server which lets me demo email integration without an internet connection; I enter the connection details into the BI Publisher Enterprise web page and my email connection is set up.
Now it’s a case of logging back in to BI Publisher Enterprise as the report owner, locating the report and then clicking on the link to schedule it.
This brings up a screen where I can set the frequency of report runs, provide an email address for the report to be sent to, and provide any other details relating to the running of the report and the different destinations it can go to, including FTP, WebDav and the filesystem.
Once the scheduled job is submitted, I can check back on the schedule details and see that the report has run correctly:
and then finally, I can start up my email application and see that the report has been delivered.
As well as BI-style reports, BI Publisher can also produce reports in any format, including mail-merge letters, a feature that’s often required by customers migrating off tools like Cognos Impromptu. Overall, this is a useful feature for customers who’ve got a lot of investment in Discoverer reports and metadata, but want a bit more flexibility in the way they can use the data.

Part II: Configuring BI Publisher to work in Single Sign-On (SSO) Environment on IIS – Deep Dive

As I mentioned in the part one of this article Configuring OC4J Applications (i.e. BI Publisher) to work in Single Sign-On (SSO) Environment on IIS,  we may need to use applications like BI Publisher on web application servers other than OC4J.
In this scenario we will see how to set up BI Publisher with Windows Native Authentication for Internet Information Services (IIS).
The way to make BI Publisher work in the SSO environment shown in this document is only one of the multiple possible solutions. Other deployment options (including for example SSO cookie or Oracle Application Server integration) can be implemented but considering your client infrustructure (i.e. IIS used all over) the Oracle Proxy integration may be the only choice.
Why Oracle Proxy?
The reason for implementing additional component is simple: BI publisher application (xmlpserver) will not run natively as an IIS application (for more information on that you can refer to the OBI 10.1.3.3.2 Release Notes document
In order to enable communication between analytics (IIS) and xmlpserver (OC4J) within IIS web application server, we will use the oracle_proxy plug-in.
Internal IIS communication is necessary because user credentials have to be passed across application. Using this approach, xmlpserver will still run on OC4J but will be accessible through IIS (and its 80 port instead of 9704)
Solution pre-requisites
The following components have to be in place before proceeding with implementation steps:
OBIEE
In the example below OBI Server and OBI Presentation Server are on different physical servers (they may also be on the same server)
BI Publisher
Installed during the OBIEE installation
Integrated with OBIEE (i.e. available from OBI using ‘More Products’ -> ‘BI Publisher’ option
-> OBIEE
-> BI Publisher
-> OBIEE analytics application deployed on IIS Web Application Server AND on OC4J in parallel
-> SSO for analytics application enabled in IIS
-> BI Publisher/BI Presentation Services should be installed on the same physical server as IIS instance
Please note that in the scenario described in this article, OBI Server and OBI Presentation Server are on different physical servers. All considerations are anyway still valid if they are on the same server.
BI Publisher is installed along with OBIEE and integrated with it (i.e. available from OBI using 'More Products' -> 'BI Publisher' option). The need to use both IIS and OC4J is due to the fact that the application will work natively on OC4J, but will communicate with IIS for SSO purposes. On this subject, in this example authentication is based on user's Active Directory credentials - username/password of user's Windows login (Windows Native Authentication).
For further information regarding enablement of SSO for analytics in IIS, please refer to myprevious article.
In this example, OBIEE has been installed as a default OC4J installation and then deployed also on IIS.
Now, let's desbribe the implementation steps.
There are two main tasks to perform:
-> Oracle Proxy Configuration
-> IIS Configuration
1. Oracle Proxy Configuration
a. Copy oracle_proxy.dll
The first step is to copy the tool to our environment.
Go to OBI Installation folder (the one that OBI was installed from – not installed to!) and localise oracle_proxy.dll file in Server\Oracle_Business_Intelligence\oc4jproxy\
b. Create proxy.conf and oproxy.log files
The following step is to create appropriate control files for our solution. Start with creating an empty file and save it as oproxy.logAfter that, create a proxy.conf file with the following lines:
· oproxy.serverlist=ias1
· # Server names that the proxy plug-in will recognize.
· oproxy.ias1.hostname=hostname.domain
· # Hostname to use when communicating with a specific server.
· oproxy.ias1.port=9704
· # Port to use when communicating with a specific server.
· oproxy.ias1.urlrule=/xmlpserver/*
· oproxy.ias1.urlrule=/xmlpserver
· # Description of URL(s) that will be redirected to this server.

Image 1
Fig 1: Proxy.conf file example (easy to get lost here!)

Image 2
Fig 2: What the oproxy folder should look like
c. Modify registry entries for Oracle Proxy to work
The third step is to modify our Windows registry.
Open a regedit session on you OBI machine as per Fig. 3 below:
Image 3
Fig 3: Regedit in Windows
Now add a new Key in My Computer -> HKEY_LOCAL_MACHINE -> SOFTWARE -> ORACLE registry
Call the new Key “IIS Proxy Adapter”
Image 4
Fig. 4: New key in the Registry
Then add three new String Values in the key created and assign values as shown below
Image 5
Fig. 5: New values for the new registry key
All done? Good! That is all on the proxy side.
Now it's time to configure IIS.
2. IIS Configuration
a. Create a Virtual Directory in IIS instance
First of all create a Virtual Directory in the IIS. This should run BI Publisher application and runs analytics application and navigate to the website that stores analytics Virtual Directory. When prompted, specify the path to the oproxy folder.
Also assign the Read/Run/Execute permisions for the new Virtual Directory as per following figure:
Image 6
Fig. 6: Permissions for the new Virtual Directory
b. Configure a ISAPI Filter for IIS Website
The next step is to add an ISAPI filter as follows:
Right-click on the Website storing oproxy Virtual Directory then Properties -> ISAPI Filters -> Add and specify the name (oproxy) and the path to the oracle_proxy.dll file (e.g. E:\OracleBI\oproxy\oracle_proxy.dll)
Image 7
Fig. 7: Creation of the ISAPI Filter
c. Configure a Web Service Extension in IIS
The final step is to configure a Web Service Extension.
NOTE: This step is not mentioned in any documentation, but trust us - it is necessary! In the IIS instance go to Web Service Extensions, then click on Add new Web Service Extension.
Image 8
Fig. 8: Web Service Extension workspace
Now specify the extension name (oproxy) and the required files (E:\OracleBI\oproxy\oracle_proxy.dll). Make sure to check the “Set extention status to Allowed”
Test!
Now it’s time to test if all the steps were properly implemented.
Restart your IIS instante. After restarting make sure oproxy ISAPI Filter is running (green arrow pointing up). If it is not running, another IIS restart may be needed
Image 9
Fig. 9: Checking the filter status
Try the following link and make sure the requested website opens:http://NQhost/xmlpserver/login.jsp (it should open a BI Publisher login website without redirecting to port 9704)
Image 10
Fig. 10: BI Publisher login page
Now let’s test BI Publisher access from OBI environment as per following figure:
image 11Fig. 11: How to launch BI Publisher from the OBIEE menu
If all steps have been followed properly, the automated login process should provide access to BI Publisher by passing the login page as follows:
image 12Fig. 12: Direct access to BI Publisher
Wrap-up
As stated earlier, this is one of the many possible ways to implement BI Publisher on IIS. We chose this one as it's industry-standard, widely used and proven. Also, the main principles of the process described above can be replicated for any OC4J native apps to be deployed on IIS - which definitely simplify a configurator's life in environments where IIS is the only web application platform and using OC4J directly is not an option.

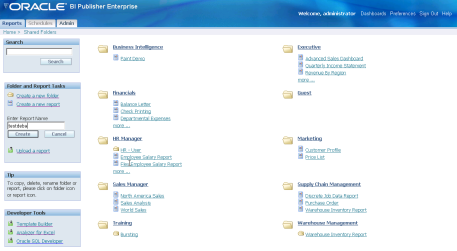
Integrating BI Publisher with OBIEE Presentation Service

1)      Login to BI Publisher using ‘Administrator’ / ‘Administrator’ and go to ‘Admin’ tab .
2)      Go to ‘Security Configurations’ .
3)      Check the option ‘ Enable Local Superuser’ and put the superuser name as ‘admin’ and password as ‘admin’ . This will make a option open so that you need not to change the SECURITY_MODEL parameter value to ‘XDO’ and ‘BI_SERVER’ to switch from local BI Publisher and BI Server based security.
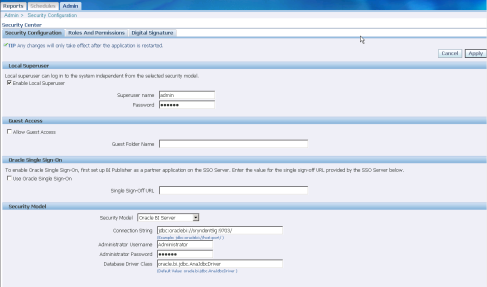
4)      Now change the Security model as per the below so that BI Publisher can talk with Presentation Services i.e Oracle BI Server . After changing click on Apply.
Integrating Publisher1
5)      Restart the OC4J daemon.
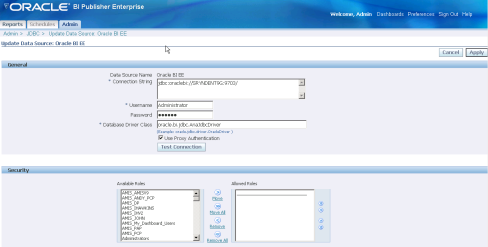
6)      Sign-In to BI Publisher once again and you can get the below connection created under Admin-) JDBC -) Oracle BI EE .
Integrating Publisher2
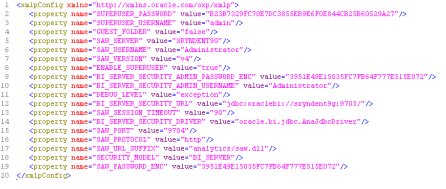
7)      Now you can able to see the file has been modified with configuration parameters ‘D:\OracleBI\xmlp\XMLP\Admin\Configuration\xmlp-server-config.xml’
Integrating Publisher3
8.)  Now try to login using BI Server Administrator password . In my case it is ‘newpass9’ and you can get below screen. Note that here ‘Admin’ tab is missing which we will make visible after some more configuration settings.
Integrating Publisher4
9)      You can get the same screen once you come from ‘BI Publisher’ option of Presentation Administrator. So now it is integrated but no Subject area no Shared Folder has been created and nothing has been setup it .Lets do that in next step.
Integrating Publisher5
Integrating Publisher6
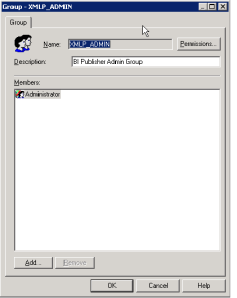
10)      Create a User group called ‘ XMLP_ADMIN’ in repository and assign the permission to be  ‘Administrator’ .
11)      Now Sign-In to BI Publisher using BI Server login credentials like ‘Administrator’/newpass9 .Here you go with Admin tab visible with the folders as well.
Integrating Publisher7
12)      Click on any of the shared folder and you can get the option to create new report .Here I am creating a new report based on existing subject area is ‘testdeba’ .
Integrating Publisher8
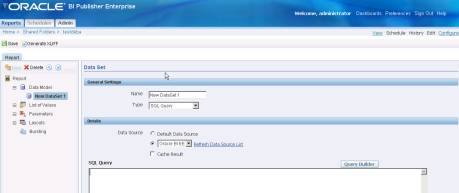
13)      Edit ‘testdeba’ and create a new datamodel with default datasource set as ‘Oracle BI EE’ .
Integrating Publisher9
14)      Click on ‘Query Builder’ and select the Schema i.e. the Subject area and select region.
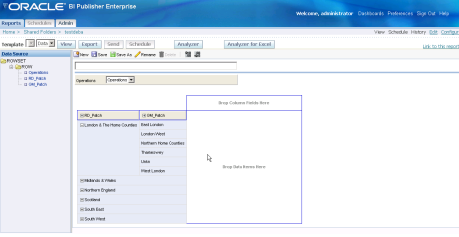
15)      Click on Save , then View and then Analyzer which will show below report after drag and drop left pane columns to respective regions .
Integrating Publisher10
16) So now the OBIEE Publisher is ready to work and details of how publisher would work is out of scope of this post. More more details refer the BI publisher Admin and User guide from Oracle.
N.B : Some of this configuration task has been already done by Oracle in latest 10.1.3.4.0 release onwards so there will no more manual interaction to handle the config parameters which is indeed good for newbies and pretty cool for experienced .Yet I think this will be helpful specially to know how the interaction managed behind the screen 

BI Publisher Module Deploy and Undeploy – OBIEE 10.1.3.3

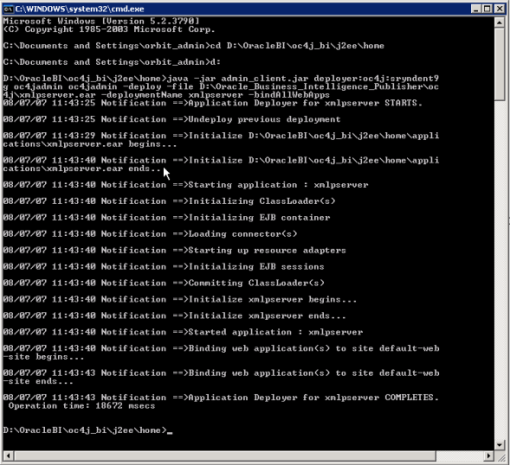
Deploying the BI Publisher Module
Below is my OC4J BI Home location . Execute this as per your environment
From command window : cd D:\OracleBI\oc4j_bi\j2ee\home
Copy : ‘Oracle_Business_Intelligence_Publisher’ folder from ‘..\OBI 10.1.3.3.2 Installer dir\Server_Ancillary’ to D drive.
Execute below :
java -jar admin_client.jar deployer:oc4j:sryndent9g oc4jadmin oc4jadmin -deploy -file D:\Oracle_Business_Intelligence_Publisher\oc4j\xmlpserver.ear -deploymentName xmlpserver -bindAllWebApps
N.B : sryndent9g is hostname and second ‘oc4jadmin’ is my password for oc4jadmin enterprise management console .( http://sryndent9g:9704/em/)
Publisher 1
Undeploy the BI Publisher Module
cd D:\OracleBI\oc4j_bi\j2ee\home
java -jar admin_client.jar deployer:oc4j:sryndent9g oc4jadmin oc4jadmin -undeploy xmlpserver
XMLP Configuration Parameter Changes
Until and unless you change the default installation parameters you are not able to log in to BI Publisher
Lets change the required parameters:
1) Edit ‘xmlp-server-config.xml‘ from path D:\OracleBI\oc4j_bi\j2ee\home\applications\xmlpserver\xmlpserver\WEB-INF’ .Change the file path as below :    <file path=”D:\OracleBI\xmlp\XMLP”/>
2) Edit ‘xmlp-server-config.xml ‘ from path ‘D:\OracleBI\xmlp\XMLP\Admin\Configuration’ .Change as <property name=”SECURITY_MODEL” value=”XDO”/> . This would basically change the security model from BI Server security to BI Publisher Security. The security model uses the configuration role mapping defined under file path D:\OracleBI\xmlp\XMLP\Admin\Security\principals.xml. The encrypted password with default installer represents ‘Administrator’ always.
3) Lets restart the OC4J service and using default password for BI Publisher as ‘Administrator’ log into the system .
Publisher 2
And you will get below :
Publisher 3
Okay now BI Publisher setup has been done for Publisher based security. Lets Sign Out .
Now login to BI Presentation services using <host>:9704/analytics/saw.dll? URL and Click on BI Publisher from More products .
This would throw below error :
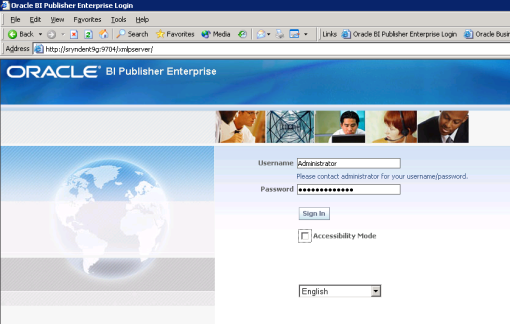
Oracle BI Publisher Enterprise Reporting Login: Login failed: Please contact administrator for your username/password.Error Details
This is for obvious reason because local BI Publisher authentication is not based on BI Server security mode rather default BI publisher XDO security mode and here Presentation service operates only on BI Server authentication mode. So the compatibility for authentication has been failed .
Lets make some more config changes to make it work in integrated mode followed by my next post .
N.B : OBIEE 10.1.3.4 onwards there is no more hassles about deploying publisher module as full installation take all this configuration under consideration until and unless you remove Publisher module during customized installation.
Although the above material helps to understand how actually the module get installed and pretty handy for your further investigation .

Oracle BI EE 10.1.3.4 – Calling BI EE WSDL from BI Publisher

Another very important and very good feature of BI Publisher 10.1.3.4 is the support for Complex Web Services. Support for Web Services in BI Publisher,i believe, was introduced in 10.1.3.2. But the major problem with that was the support was limited to very simple web services like Yahoo Stock quotes etc. But now with the support for complex web services, one can achieve more complex integration with BI EE as well as other reporting toolsets. One direct correlation of this support is the ability of BI Publisher now to have BI EE WSDL as a data source. Yes, BI Publisher now can call BI EE WSDL’s directly. Till the previous release, the only way to achieve this was by converting the complex WSDL to a simple one through servlets. Lets try this new feature out today by means of a simple report. We shall start with a new report with Web Service as the data source.
     
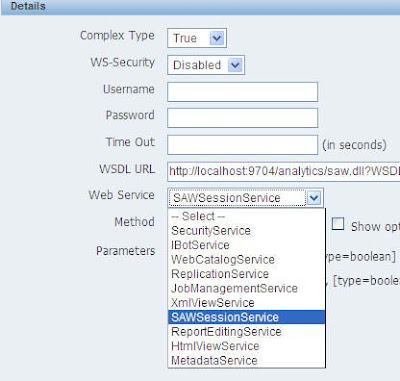
When we choose Web Service as our data source, we can now see there are 2 types of Web Services. Simple or Complex.
     
Lets choose complex. And in the WSDL URL lets enter the BI EE WSDL.
1http://localhost:9704/analytics/saw.dll?WSDL
As soon as we enter the above WSDL, we should now be able to choose any one of the web services. Remember BI EE WSDL is a multi binding web service. That is, a single WSDL can provide a combination of multiple web services. For now lets choose SAWSession Service.
     
Lets choose the Logon method and enter the username and password parameters.
     
Now, lets see what happens when we look at the report output.
     
Strange. I was expecting the Web Service to return back the SessionID. But unfortunately it does not look to be straightforward. So far, i have not been able to get this to work (even when i try to pass the parameters from BIP parameters using ${Parameter_name}). Now, if you see the OC4J command window, you would see the actual SOAP envelope that has been fired by BI Publisher.
     
Now, lets copy the above SOAP envelope and fire it from SOAP UI to test whether this envelope actually works.
     
Well, it does work. So, I am not sure what else is required to get the login method to work from within BI Publisher. I believe the above behavior is probably due to the fact that BI Publisher actually tried to fire the SOAP envelope using a dummy parameter first and then with the actual parameters i,e your OC4J would actually show you the 2 SOAP envelopes being fired from BI Publisher
0108/08/12 20:04:45 WebServiceCall::callComplexClient SOAP Message = <soap:Envelope xmlns:soap="http://schemas.xmlsoap.org/soap/envelope/">
02      <soap:Body xmlns:ns1="com.siebel.analytics.web/soap/v5">
03            <ns1:logon>
04                  <ns1:name>%LABEL_1%</ns1:name>
05                  <ns1:password>%LABEL_2%</ns1:password>
06        </ns1:logon>
07    </soap:Body>
08</soap:Envelope>
0908/08/12 20:04:45 After WSS soapMessage = <soap:Envelope xmlns:soap="http://schemas.xmlsoap.org/soap/envelope/">
10      <soap:Body xmlns:ns1="com.siebel.analytics.web/soap/v5">
11            <ns1:logon>
12                  <ns1:name>Administrator</ns1:name>
13                  <ns1:password>Administrator</ns1:password>
14        </ns1:logon>
15    </soap:Body>
The authentication failed message that we obtained is probably due to the first envelope. Not sure what more is required to get this to work. A very interesting feature but something i have not been able to test successfully so far(atleast with BI EE alone).