I had some time today to put together a simple document for enabling Multi-User Development(MUD) for repositories. Typically when you have many data sources and lots of tables, it would make sense to distribute the repository development work to multiple users. MUD is basically a feature of the BI EE admin tool wherein multiple users can work on the repository at the same time. The concept of Repository Merging was actually introduced in order to facilitate MUD. Lets try to understand the concept of MUD today.
Lets start with the simple diagram below.
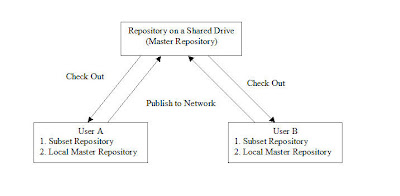
The above diagram illustrates how the MUD works. In order for the MUD to work following are the pre-requisites
1. A shared drive to host the Master Repository
2. All the client machines should have access to the master repository.
3. All the client machines should have the admin tool installed.
2. All the client machines should have access to the master repository.
3. All the client machines should have the admin tool installed.
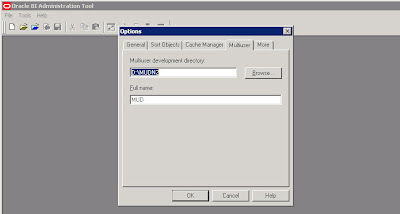
For the MUD to work, the repository that is worked upon by all the users should be kept in a shared directory. This shared directory should be accessible to all the users. In each of the client’s Admin tool, enter the Shared Directory path.
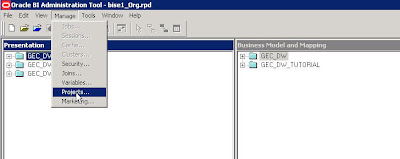
Now, open the Master repository in offline mode. The entire concept of MUD revolves around objects called as Projects. So, from within the Admin tool navigate to Manage – Projects.
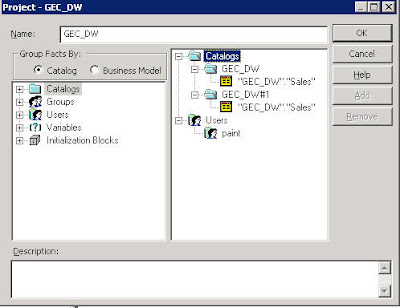
This will open up a project window. Projects are basically subsets of objects within the Admin tool that can be assigned to individual users. So, the idea is to assign different projects to different users. Also, each of these projects can contain one or more Logical Fact tables. As soon as a logical fact table is included all the other dependent objects would automatically be part of the project. Typically when we start with a repository, we would not be having any BM or presentation layers. So, it is recommended that one imports all the physical tables and creates the physical joins in the repository first before implementing MUD. After that we can create dummy BM and presentation layers so that they can be assigned to individual projects. Also, one can assign Users, Init Blocks and Variables to a project.
After creating and assigning objects to a project, the next step is to save the master repository in a shared drive. Now, open up a client Admin tool and navigate to File – Multiuser – Checkout. This Check out process does 2 things
1. Copies the Master repository from the shared drive to the local drive ( This will serve as the local master repository).
2. Gives you a screen to choose the project that you have the authority to work on.
3. Creates a subset repository (would ask you to enter the name) which would contain only the selected project related data.
2. Gives you a screen to choose the project that you have the authority to work on.
3. Creates a subset repository (would ask you to enter the name) which would contain only the selected project related data.
So, basically the idea is to work on the subset repository (like creating/deleting dimensions, hierarchies etc) and then merge the changes back to the local master repository. The merge process will lock the master repository in the shared drive. In order to release the lock one would have to Choose “Publish to Network” which will copy the modified and merged local master repository to the shared drive. The process would be the same for all the other users.

